
onboard air for under $150
#1
 06-23-2009


Join Date: Oct 2004
Location: Oswego, IL
Posts: 387
Likes: 0
Received 0 Likes
on
0 Posts
onboard air for under $150
**** this is installed in my silverado, mounting locations will vary in a ranger.
I set up an onboard air system using a compressor that many in the offroad community have heard of....the tsunami MF-1050.
Here is a break down of the items I used and their costs.
MF-1050 compressor- $60 at pepboys
7 Gallon Air tank - about $20, I had one already and while its not the idea style tank it works for now
20' 3/8" Air Hose - $12
Miscellaneous Fittings - $10 plus those that I had in stock
1/8" Air Line to run gauge to cab - $5
Pressure Switch W/ Relay 85 psi on, 105 psi off. - $23
Switch to turn compressor on/off in cab - $2
Misc Electrical fittings - Had in stock so free.99
Misc nuts and bolts- also free.99
Total Cost - $132
The install
This is the pump

Rated at 150psi max, 2.5cfm @0psi 1.5cfm @90 psi 40 minute maximum run time, and it will auto shut off at that point due to heat.
it comes with a nice carry bag, power cord w/ built in battery clips (too powerful of a pump to plug into the cig lighter) has a waterproof on off switch, air hose, and spare 30 amp fuse.
The major problem with this pump is it uses an oddball fitting on the pump itself, luckily the hole that is threaded for that fitting is the perfect pilot size for a 1/4-18 npt tap. so take out the old fitting, tap it and install a standard fitting.
Now that that was out of the way it was time to hard mount it under the hood. Thankfully I have a great spot, the 2nd battery tray, unfortunately none of the bolts for that will line up w/ the base of the compressor (you have to remove the little rubber feet to access the holes) so you have to drill and use your own hardware.
here it is mounted

now to wire it in, this is pretty simple, just cut off the battery clamps, and put ring terminals on their and connect it to the battery. Fuse is already built into the power wires. Now once i get enough money to buy the pressure switch/relay combo, ill have to snip the harness, install the switch where the factory gauge goes on the pump (its not accurate, and ill have one on the tank so no use on having a gauge under the hood) I am told the hole for the gauge is standard 1/8" npt but we will see it may need to be tapped.
Now for the air hose
I ran that down along a wire harness that comes from the fuse box down along the frame, I ran the hose with zip ties along the top of the frame rail to protect it, and then up past the fuel fill neck and into the bed through the hole that is up under the bedrail,
you can kinda see in this pic how its routed near the bed

I still have to cut the hose to length but i didn't have any more compresson fittings like i tought i did.
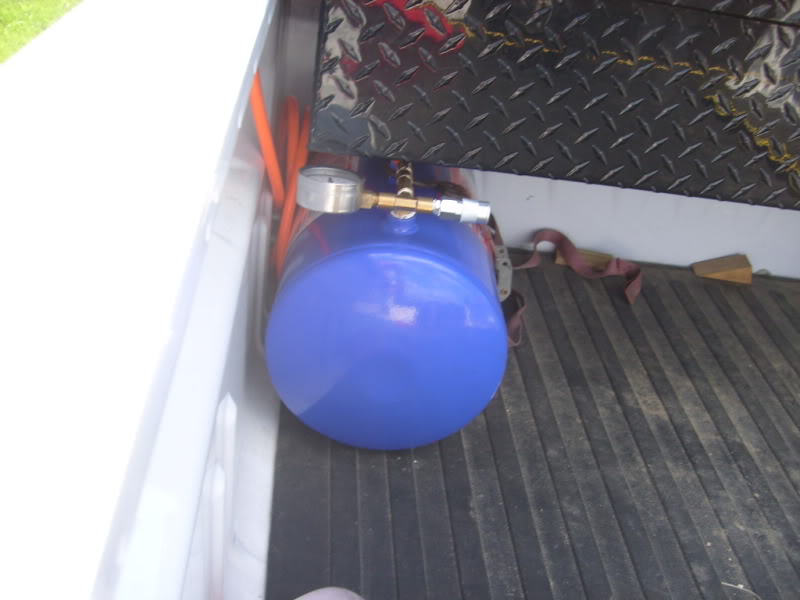
On to the tank,
It is from walmart the 7 gal blue tank, it has a base on it w/ 2 mounting holes, I drilled 2 holes into the bed floor, ran 2 bolts up through them and put a nut on each to keep them from falling back through the bed floor, I then slid the tank on and 2 more nuts/lock washers hold it down.
I used a pair of T's on the top of the tank, one with a built in safety valve, installed the hose in one end of the 1st T, and another T in the second end, a gauge and a quick coupler are connected to the 2nd T. This gauge will be relocated into the cab once it cools off around here.
here it is mounted under the tool box
Results,
I have a awesome onboard air set up, that actually has decent power, The tank pumps up from 0-100 psi in about 2 1/2 mins, and the 85-105 psi that it will have to do with the pressure switch takes just over 1 mintue. I ran an air ratchet off of it for a little while and that seems to do okay, although thats not what I intend to use it for (air tools) but it works great for pumping up tires, and will be nice blowing off the truck after I wash it (in the mirrors and such where water always drips out)
any questions or suggestions just ask, ill update after I use it a bit, and install the pressure switch and in cab gauge and master power switch.
I set up an onboard air system using a compressor that many in the offroad community have heard of....the tsunami MF-1050.
Here is a break down of the items I used and their costs.
MF-1050 compressor- $60 at pepboys
7 Gallon Air tank - about $20, I had one already and while its not the idea style tank it works for now
20' 3/8" Air Hose - $12
Miscellaneous Fittings - $10 plus those that I had in stock
1/8" Air Line to run gauge to cab - $5
Pressure Switch W/ Relay 85 psi on, 105 psi off. - $23
Switch to turn compressor on/off in cab - $2
Misc Electrical fittings - Had in stock so free.99
Misc nuts and bolts- also free.99
Total Cost - $132
The install
This is the pump
Rated at 150psi max, 2.5cfm @0psi 1.5cfm @90 psi 40 minute maximum run time, and it will auto shut off at that point due to heat.
it comes with a nice carry bag, power cord w/ built in battery clips (too powerful of a pump to plug into the cig lighter) has a waterproof on off switch, air hose, and spare 30 amp fuse.
The major problem with this pump is it uses an oddball fitting on the pump itself, luckily the hole that is threaded for that fitting is the perfect pilot size for a 1/4-18 npt tap. so take out the old fitting, tap it and install a standard fitting.
Now that that was out of the way it was time to hard mount it under the hood. Thankfully I have a great spot, the 2nd battery tray, unfortunately none of the bolts for that will line up w/ the base of the compressor (you have to remove the little rubber feet to access the holes) so you have to drill and use your own hardware.
here it is mounted
now to wire it in, this is pretty simple, just cut off the battery clamps, and put ring terminals on their and connect it to the battery. Fuse is already built into the power wires. Now once i get enough money to buy the pressure switch/relay combo, ill have to snip the harness, install the switch where the factory gauge goes on the pump (its not accurate, and ill have one on the tank so no use on having a gauge under the hood) I am told the hole for the gauge is standard 1/8" npt but we will see it may need to be tapped.
Now for the air hose
I ran that down along a wire harness that comes from the fuse box down along the frame, I ran the hose with zip ties along the top of the frame rail to protect it, and then up past the fuel fill neck and into the bed through the hole that is up under the bedrail,
you can kinda see in this pic how its routed near the bed
I still have to cut the hose to length but i didn't have any more compresson fittings like i tought i did.
On to the tank,
It is from walmart the 7 gal blue tank, it has a base on it w/ 2 mounting holes, I drilled 2 holes into the bed floor, ran 2 bolts up through them and put a nut on each to keep them from falling back through the bed floor, I then slid the tank on and 2 more nuts/lock washers hold it down.
I used a pair of T's on the top of the tank, one with a built in safety valve, installed the hose in one end of the 1st T, and another T in the second end, a gauge and a quick coupler are connected to the 2nd T. This gauge will be relocated into the cab once it cools off around here.
here it is mounted under the tool box
Results,
I have a awesome onboard air set up, that actually has decent power, The tank pumps up from 0-100 psi in about 2 1/2 mins, and the 85-105 psi that it will have to do with the pressure switch takes just over 1 mintue. I ran an air ratchet off of it for a little while and that seems to do okay, although thats not what I intend to use it for (air tools) but it works great for pumping up tires, and will be nice blowing off the truck after I wash it (in the mirrors and such where water always drips out)
any questions or suggestions just ask, ill update after I use it a bit, and install the pressure switch and in cab gauge and master power switch.
#2
06-23-2009
#3
06-23-2009
Join Date: Oct 2004
Location: Oswego, IL
Posts: 387
Likes: 0
Received 0 Likes
on
0 Posts
well its sealed up pretty well, you can relocate the filter using a section of air hose, and the switch is waterproof, so im guessing water resistant??
a lot of jeep/hummer guys have these mounted under their hoods w/ no problems, Im sure as long as you kept it up kinda high and weren't submerging the thing it should be fine.
a lot of jeep/hummer guys have these mounted under their hoods w/ no problems, Im sure as long as you kept it up kinda high and weren't submerging the thing it should be fine.


#7
06-23-2009
Join Date: Oct 2004
Location: Oswego, IL
Posts: 387
Likes: 0
Received 0 Likes
on
0 Posts

#10
06-24-2009
Join Date: Oct 2004
Location: Oswego, IL
Posts: 387
Likes: 0
Received 0 Likes
on
0 Posts
Your comment about cheap components isn't all that valid. Google mf-1050 and read. You will see that this is a fairly good compressor for what I plan to use it for. That is really the only "cheap" thing in this system. A viair pressure switch is on order and those are quality units. The tank and hose are just a tank and hose really there is little value in buying a more expensive tank unless u want higher pressures
#11
06-24-2009
#12
06-24-2009
Join Date: Aug 2007
Location: Golden, CO
Posts: 487
Likes: 0
Received 0 Likes
on
0 Posts
#13
06-24-2009
Join Date: Mar 2007
Location: shelbyville,tn
Posts: 196
Likes: 0
Received 0 Likes
on
0 Posts
#14
06-24-2009
Join Date: Oct 2004
Location: Oswego, IL
Posts: 387
Likes: 0
Received 0 Likes
on
0 Posts
#15
06-25-2009
How does that compressor hold up at 105psi?
I had an MV-50 but I never ran it with a tank.
I use a Q89 now (similar but dual air pumps), and it inflated tires pretty quick but I have not run it with a tank yet either.
I had an MV-50 but I never ran it with a tank.
I use a Q89 now (similar but dual air pumps), and it inflated tires pretty quick but I have not run it with a tank yet either.
The Q-89 or "Dually" is a 12 Volt Hi-Pressure Twin Cylinder Portable Air Compressor. Inflates tires 50% faster than the single pump SuperFlow MV-50 and MasterFlow MF-1050 models. This unit is equipped with a quick release 24 foot yellow coiled hose with a tire gauge attached, 10 foot power cord with circuit breaker and heavy duty clamps that connect directly to the battery, soft nylon carrying bag, and chrome plated construction. Fills a 35" tire from 10 PSI to 35 PSI in approximately 2-1/2 minutes!
Motor: 12 Volt DC
Maximum Power: 47 Amps
Maximum Working Pressure: 120 PSI
Direct Drive, Reciprocating Engine
Maximum Recommended Continuous Operating Time: 40 minutes
Recommended on/off cycle time: 20/30 minutes.
Motor: 12 Volt DC
Maximum Power: 47 Amps
Maximum Working Pressure: 120 PSI
Direct Drive, Reciprocating Engine
Maximum Recommended Continuous Operating Time: 40 minutes
Recommended on/off cycle time: 20/30 minutes.
#16
06-25-2009
If it blows you can always buy another one. Still I don't know of a lot of people running them with tanks so I'm interested to see how this holds up.
I may run my Q89 with a small tank at some point if I ever get around to wiring up half of the things I intend to.
#18
06-25-2009
The MV-50 compressors are actually pretty popular, decent units. I used mine to air up my 33's and my roommates 33's from 12psi to 30psi all the time, never had a problem with it.
If it blows you can always buy another one. Still I don't know of a lot of people running them with tanks so I'm interested to see how this holds up.
I may run my Q89 with a small tank at some point if I ever get around to wiring up half of the things I intend to.
If it blows you can always buy another one. Still I don't know of a lot of people running them with tanks so I'm interested to see how this holds up.
I may run my Q89 with a small tank at some point if I ever get around to wiring up half of the things I intend to.
#20
06-25-2009
#21
06-26-2009
Join Date: Oct 2004
Location: Oswego, IL
Posts: 387
Likes: 0
Received 0 Likes
on
0 Posts
I just didn't have one when I put it all in. Once I get the pressure switch ill be throwing one of those in too. The system came in handy yesterday when the concrete contractors bobcat tire went flat. Filled it up much quicker than I expected with the tank at 110 psi when I started. The foreman wants me to install one of these in his truck now haha

Thread
Thread Starter
Forum
Replies
Last Post
For Sale: Viair onboard air setup
korey89
OLD - Interior, Exterior, Electrical, & Misc.
3
10-11-2009 08:34 PM


