
The "What did you do to your Ranger today" thread
#2826
 09-28-2011


Join Date: Mar 2008
Location: brampton, ontario
Posts: 26
Likes: 0
Received 0 Likes
on
0 Posts
Hurst Shifter
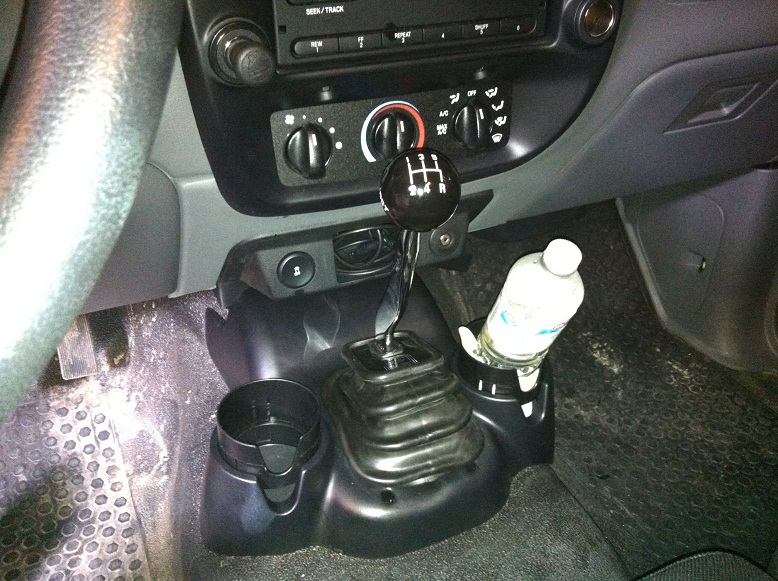
This is kind of cheating 'cause I didn't do it today - I did it in June; but I installed a hurst shifter in my ranger.
I ended up ordering it because I attempted to change the shift **** on my 2010 sport, and after a lot of grunt work and making a huge mess of my shifter, I realized I couldn't attach anything to the top without some serious customization.
All-in-all, I ended up buying a Hurst Shifter - and now am very freakin happy that I screwed the thing up to begin with. I did the work myself (using a tutorial on here.. I just searched for 15 mins and couldn't find it again - sorry to whomever it was - I owe you! The step-by-step tutorial was awesome!). The whole project altogether took me about 4 hrs (in twilight where i could barely see lol).
Anyways, in hindsight I should have taken some pictures before and during... but here are some pics after the installation - did I mention this is the best decision I've ever made?

Last edited by Ranger_Chris; 09-28-2011 at 07:46 PM. Reason: Resized the pictures!
#2827
09-29-2011

Did you add any insulation under the cup holder/shift bezel ?
You will need to if not, to get rid of the gear noise/vibration.
There is a "How-To" on the subject but just use some foam. I used some sound proof mat on the floor and arund the shifter but it is needed.
Luck
You will need to if not, to get rid of the gear noise/vibration.
There is a "How-To" on the subject but just use some foam. I used some sound proof mat on the floor and arund the shifter but it is needed.
Luck
This is kind of cheating 'cause I didn't do it today - I did it in June; but I installed a hurst shifter in my ranger.
I ended up ordering it because I attempted to change the shift **** on my 2010 sport, and after a lot of grunt work and making a huge mess of my shifter, I realized I couldn't attach anything to the top without some serious customization.
All-in-all, I ended up buying a Hurst Shifter - and now am very freakin happy that I screwed the thing up to begin with. I did the work myself (using a tutorial on here.. I just searched for 15 mins and couldn't find it again - sorry to whomever it was - I owe you! The step-by-step tutorial was awesome!). The whole project altogether took me about 4 hrs (in twilight where i could barely see lol).
Anyways, in hindsight I should have taken some pictures before and during... but here are some pics after the installation - did I mention this is the best decision I've ever made?
Attachment 24767
Attachment 24768
#2828
09-30-2011
Join Date: Apr 2009
Location: Orlando, Florida
Posts: 34
Likes: 0
Received 0 Likes
on
0 Posts


#2829
10-01-2011

Join Date: May 2009
Location: Hazleton, PA
Posts: 216
Likes: 0
Received 0 Likes
on
0 Posts
OMG where do I start?
I've made some mad progress on my clutch "project".
Got all new parts: Front prop shaft, sandblasted rear driveshaft, new tranny mount, new crossmember, new U-joints all around, Centerforce clutch, new clutch slave cylinder... and I even had the flywheel machined. Also got new bolts for everything.
Clutch slave cylinder and flywheel are on but the new clutch doesn't seem to line up right. Compared it to the original clutch and it's an exact match (except not worn at all).
Going to pull the flywheel and see what I'm doing wrong.
After that, still gotta get that stray stud out of the transfer case flange.
Lastly, I'm going to POR-15 EVERYTHING before putting it all back together.
#2830
10-01-2011


#2833
10-01-2011

Join Date: Aug 2009
Location: Okeechobee,FL / Singapore
Posts: 563
Likes: 0
Received 0 Likes
on
0 Posts

#2838
10-02-2011
Join Date: May 2009
Location: Hazleton, PA
Posts: 216
Likes: 0
Received 0 Likes
on
0 Posts
Got the new clutch in (FINALLY  ), tranny lined up and bolted back in, and put in a new (junkyard) crossmember. The old one was rusted through and broken in several places.
Now I have to POR-15 both driveshafts and somehow put the starter back in.
I've also managed to remove the rear flange on the transfer case and actually got the broken stud out
Gonna replace the seal back there if I ever find a new one to put in....
), tranny lined up and bolted back in, and put in a new (junkyard) crossmember. The old one was rusted through and broken in several places.Now I have to POR-15 both driveshafts and somehow put the starter back in.
I've also managed to remove the rear flange on the transfer case and actually got the broken stud out
Gonna replace the seal back there if I ever find a new one to put in....
#2839
10-02-2011
#2840
10-03-2011

Join Date: Oct 2010
Location: Pennsville
Posts: 11
Likes: 0
Received 0 Likes
on
0 Posts

#2841
10-04-2011

Join Date: Mar 2011
Location: Mount vernon, Ohio
Posts: 21
Likes: 0
Received 0 Likes
on
0 Posts

#2843
10-04-2011
Join Date: Aug 2009
Location: Okeechobee,FL / Singapore
Posts: 563
Likes: 0
Received 0 Likes
on
0 Posts
Attempted to pull my Blazer from its final resting place, couldn't do it. So I hooked it to the trailer and used the jeep to do it. No problem. Get it in place and move the jeep to use the winch to pull it onto the trailer, get it on there and set in place lock it down, back the truck onto the driveway and notice its definatly time for springs. So much for the $ I got for selling the blazer. First time I'll be down to 3 vehicles in 12 years.
#2844
10-04-2011
Join Date: Sep 2011
Location: beverly ma
Posts: 72
Likes: 0
Received 0 Likes
on
0 Posts
#2845
10-04-2011
Finally fixed all the issues I've been having with it. As some of you know I've been running lean on bank 1 and 2 now for over a year. Pulled like 20 codes at the time. All the sensors that had to do with the emissions were out, so one by one I replaced them, MAF, IAC, and all the Oxygen Sensors. Still was running lean in both banks, so I replaced the intake gasket as it had a leak and a vacuum line. It was still running lean. Checked EGR, working perfect, I was completely lost of where to look next. Mind you during this time I had replaced the spark plugs 3 times as they kept fouling out, spark plug wires once.
So yesterday I had some extra cash and the coil pack was original with 218xxx miles on it. So I replaced that as well with a new set of spark plugs. Fixed all my rough idle and misfire issues, truck isn't running lean no more. Still confused on that, cause the truck should have ran rich if it wasn't getting enough spark, maybe the computer over compensated and made it run lean I don't know. All I care is that it is no longer running lean.
So yesterday I had some extra cash and the coil pack was original with 218xxx miles on it. So I replaced that as well with a new set of spark plugs. Fixed all my rough idle and misfire issues, truck isn't running lean no more. Still confused on that, cause the truck should have ran rich if it wasn't getting enough spark, maybe the computer over compensated and made it run lean I don't know. All I care is that it is no longer running lean.
#2846
10-05-2011
Join Date: Oct 2011
Location: Henderson
Posts: 1
Likes: 0
Received 0 Likes
on
0 Posts
Cabin Roof 97 xlt
ten bucks for fabric and ten for spray adhesive.

Uploaded with ImageShack.us

Uploaded with ImageShack.us

Uploaded with ImageShack.us

Uploaded with ImageShack.us
Last edited by natemaybee; 10-05-2011 at 01:13 AM. Reason: images
#2847
10-05-2011

#2850
10-05-2011


