More Pics 56k :-(
#1
More Pics 56k :-(
Here's a few more.... enjoy
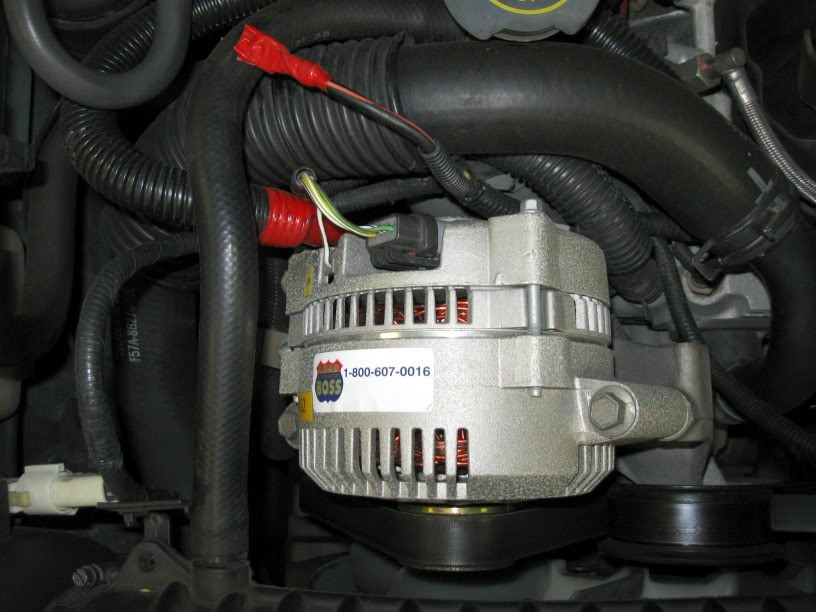
200 Amp alternator.

You can see I left the OEM alternator Black/Orange wire taped off.
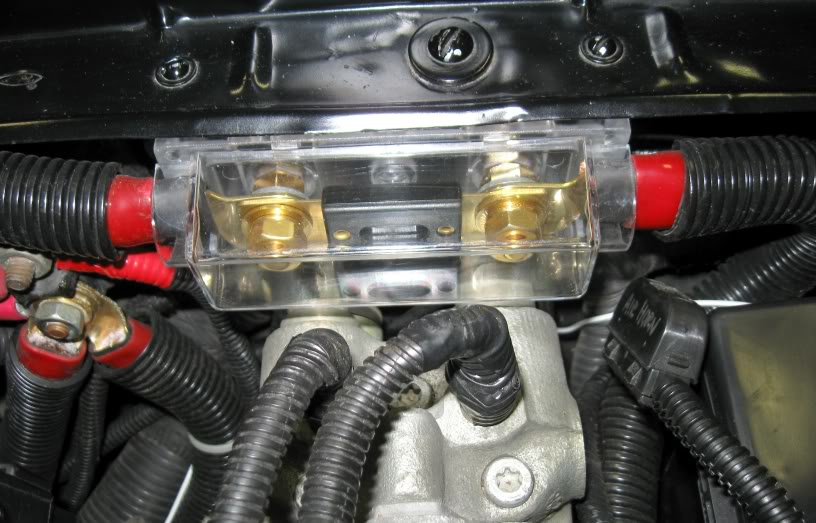
100 Amp fuse & holder that feeds my audio distribution fuse block in the cab.

That 1/0ga wire is a little rough to bend, but not nearly as bad as crimping the ring terminals.
I wrapped some wire loom around those two lines in front of the fuse holder to keep from shorting the battery or fuse when installing or changing fuses.
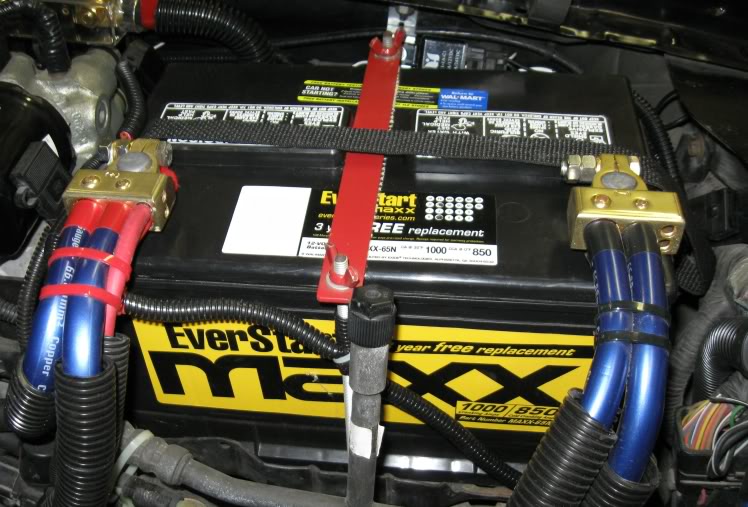
Battery, side & top shot.

Yup, two 1/0ga ground wires. One goes to the starter & the other ties the battery to the body to the frame. No grounding issues here.
These battery terminals were made for 1-4ga, 1-1/0ga & 2-8ga cables. I drilled out one of the 4ga holes to squeeze in an extra 1/0ga cable on both terminals.
Positive side has a 1/0ga to the alternator/relay/fuse setup while the other 1/0ga runs up to the 100A fuse & into the cab where it feeds a fused distribution block. There's a fuse (same holder as the audio fuse, just a 250A fuse instead of 100A) between the alternator and the OEM relay thing.
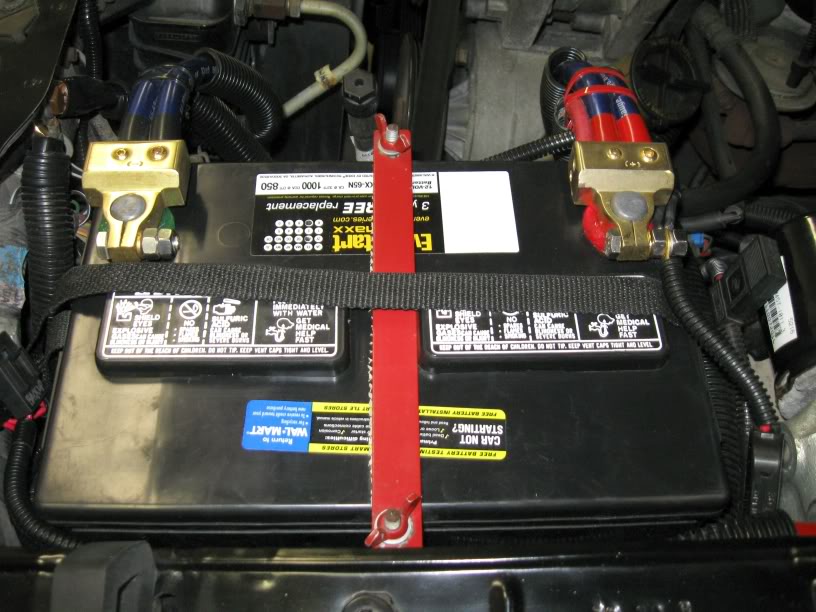
The 6ga+/- red wire is the OEM wire to the starter. The small wire under that one goes to.... something, I can't remember right now.
The wires were so close together that I couldn't get the wire loom all the way up to the terminals.

The small power wires connected with ring terminals go to the fog lights, backup lights & wimpy air horn.
The gold bolts that came with the battery terminals used an allen wrench & a nut. I could never keep up with the allen wrench & the darn things were already starting to rust so I replaced both bolts with stainless steel bolts & nuts. I'd like to see THESE rust!
Fog light relays.

I wanted to keep the relays out of the way, so I made a bracket & bolted them under the fender/hood lip.
The fuses are tucked away in front of the battery. Not much to see there.
You can also see my hi-tech battery hold down device.
Luckily, this battery just fit in the OEM location. I think it had the most CCA's of any of these MAXX batteries. Hopefully 850/1000cca's will be enough.
200 Amp alternator.

You can see I left the OEM alternator Black/Orange wire taped off.
100 Amp fuse & holder that feeds my audio distribution fuse block in the cab.

That 1/0ga wire is a little rough to bend, but not nearly as bad as crimping the ring terminals.
I wrapped some wire loom around those two lines in front of the fuse holder to keep from shorting the battery or fuse when installing or changing fuses.
Battery, side & top shot.

Yup, two 1/0ga ground wires. One goes to the starter & the other ties the battery to the body to the frame. No grounding issues here.
These battery terminals were made for 1-4ga, 1-1/0ga & 2-8ga cables. I drilled out one of the 4ga holes to squeeze in an extra 1/0ga cable on both terminals.
Positive side has a 1/0ga to the alternator/relay/fuse setup while the other 1/0ga runs up to the 100A fuse & into the cab where it feeds a fused distribution block. There's a fuse (same holder as the audio fuse, just a 250A fuse instead of 100A) between the alternator and the OEM relay thing.
The 6ga+/- red wire is the OEM wire to the starter. The small wire under that one goes to.... something, I can't remember right now.
The wires were so close together that I couldn't get the wire loom all the way up to the terminals.

The small power wires connected with ring terminals go to the fog lights, backup lights & wimpy air horn.
The gold bolts that came with the battery terminals used an allen wrench & a nut. I could never keep up with the allen wrench & the darn things were already starting to rust so I replaced both bolts with stainless steel bolts & nuts. I'd like to see THESE rust!
Fog light relays.

I wanted to keep the relays out of the way, so I made a bracket & bolted them under the fender/hood lip.
The fuses are tucked away in front of the battery. Not much to see there.
You can also see my hi-tech battery hold down device.
Luckily, this battery just fit in the OEM location. I think it had the most CCA's of any of these MAXX batteries. Hopefully 850/1000cca's will be enough.
#4
#5
I'm sure it differs on other years though.
When I upgraded the alt, I kept the factory wire placement locations, but I went from +/-6ga to 1/0ga.
#6
I was planning on adding a 500 - 800w sub amp to go with my 400w 4ch amp but never got around to it.
The 1/0ga ring terminals were super extra heavy duty & I only had a heavy duty crimper

Plus, after a few of them my hands were ready to give out.
Anything 4ga or smaller isn't too bad to crimp.
I'd like a Optima, but I just can't justify spending almost $200 for a battery. I could buy 3 of these & have money left for more goodies.
My last WallyWorld battery gave up a week before it's 6 yr warranty expired so I can't complain.
Thread
Thread Starter
Forum
Replies
Last Post
kyle12201
Snapshots
8
07-23-2009 09:21 PM


