
DIY: Ford Ranger Double DIN Install
#1
 10-17-2012
Thread Starter
|
Member

Joined: Dec 2008
Posts: 16
Likes: 1
From: FL
DIY: Ford Ranger Double DIN Install
I created this article for those looking to do their own install. Most of this information can be found by searching around the various ranger forums (got my inspiration from korey89 - How-To: Install A Kenwood Double Din And Audiovox Rear Camera), I figured Id would put it all in one place. I know I would have appreciated it! This was the first time I have ever installed my own radio, but Im not a complete newb when it comes to overall car mechanics. The install was actually fairly easy after gathering all the info I needed from various ranger and audio forums. After a few days of research and viewing sveral other members installs, the American International dash kit seemed like the best kit. I believe its the only one that allows for a "flush" mount installation out of the three major kits (AI, Metra, Scosche).
Parts Need For Double Din / Navigation Installation:
American International FM-K552 Dash Kit - Double Din Dash Kit
fmk552.jpg?t=1350065863
Metra 70-1771 Wiring Harness - To Connect your factory 98-up Ranger harness to the Pioneer harness.
met-701771.jpg?t=1350065863
Scosche DIN Factory Radio Removal Tool - Not necessary, but recommended to remove factory radio.
dt1.jpg?t=1350065862
Dremel W/ Various Bits - To cut your bezel to allow for double DIN to slide in. I actually bought a $10 off-brand kit from Harbor Freight. It was way under-powered, but it got the job done. Took about 30 minutes to complete mine. If you have a real Dremel, it will go MUCH faster for you.

Pioneer F90BT w/ Back-Up Camera & iPod Cable

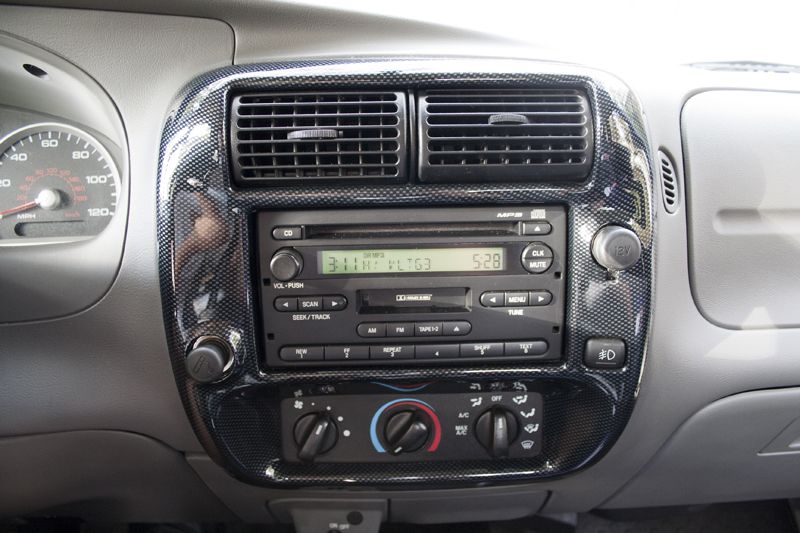
This is my Stock Double DIN MP3 Radio
I used the Metra radio removal tool to get my stock unit out. These arent necessary, but they sure made is VERY easy!
IMG_4545.jpg?t=1350481917
Stock Radio Removed from Bezel
IMG_4546.jpg?t=1350481917
You have to do some trimming to the bezel for most aftermarket double DINs to fit. Simply remove the two screws shown, and the whole thing pops out pretty easily. I found it easier to pull from the top near the AC vents.
IMG_4544.jpg?t=1350481917
To fit the new head unit, you will need to trim the top and bottom ridges as shown below. DO NOT trim the vertical sides of the bezel opening, the dash kit uses these to clip in.
IMG_4549.jpg?t=1350481919
I was extra precautious, so I used 3m tape to protect the surround from getting scratched or gouged by the dremel.
IMG_4550.jpg?t=1350481920
After using a dremel tool, this is the finished product and what yours should look like before you can install the new head unit.
IMG_4554.jpg?t=1350481919
The American International Dash Kit was very straight forward. Just attach the two side pieces to the unit with the supplied screws. Then slide it into the bezel until it "clicks" into place. You have some adjustability with this kit, I preferred the "flush" look. Once you get the desired look, tighten everything down and snap the trim surround piece over the front and your done!
IMG_4558.jpg?t=1350481921
Then you will need to take the supplied head unit harness and match it up with the Metra harness made for your vehicle. At this time, I hardwired the video "bypass" so I could have full functions while driving also.
For the Pioneer "F" Series, you just need to move the mute wire pin in the harness, and then ground it with the green wire. I used the following diagram to bypass my Pionner unit.
AVIC "F" Series Bypass (Picture Guide) - CLICK HERE
IMG_4559.jpg?t=1350481922
*Before you put everything back in the truck, you will need to run the GPS Antenna, Bluetooth Mic, Reverse Camera, iPod hookups, etc.
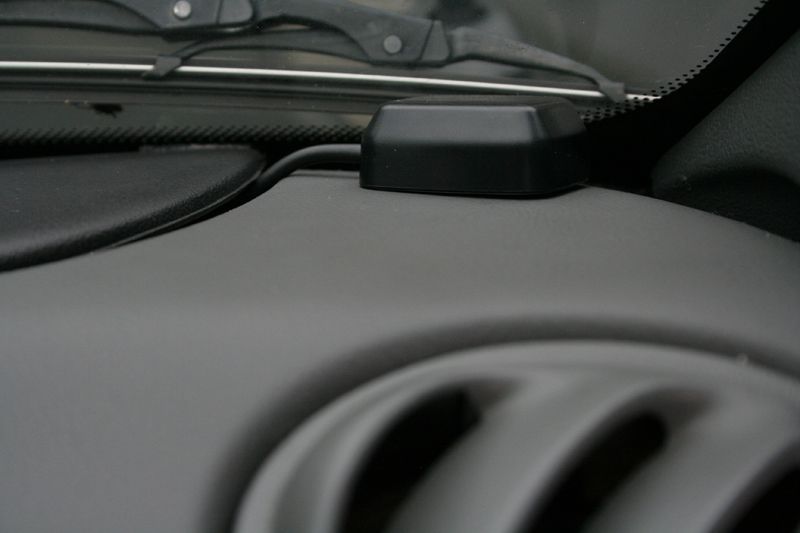
I did not want to run any wires outside of the truck(nor put the magnet on my paint), so I decided to mount the GPS antenna on the dash near the defrost vents. The black defrost trim simply snaps up and then you can feed the wire through the dash to the head unit. I am very happy with the location and on the way home and even in my garage I had full GPS signal.
Next I ran the Bluetooth Mic up to the sun visor. I removed the visor to run the wire through the headliner, then down the A-pillar(behind the trim), through the defrost trim just like the GPS and finally through the dash to the head unit. You cant any wires at all except where it comes out in the visor.
IMG_4574.jpg?t=1350481926
I got my head unit used and it was missing the mic clip, so I just let the visor hold it for now.
IMG_4573.jpg?t=1350481926
Next I ran the iPod hookups to the glove box.
IMG_4583.jpg?t=1350481928
I then plugged in all the wires and re-installed the bezel. Here is the finished product!
IMG_4587.jpg?t=1350481930
IMG_4585.jpg?t=1350481930
I added a little custom touch to the start up screen to give it a little more "OEM" feel.. This is the loading screen in all the new Ford vehicles with "Sync". :D
IMG_4591.jpg?t=1350481932
You can also adjust the illumination of the head unit to match the rest of your factory controls and cluster. So I made mine green to match the rest of my displays.
IMG_4569.jpg?t=1350481924
Playing through the iPod with full control from the head unit.
IMG_4567.jpg?t=1350481923
And GPS.
IMG_4570.jpg?t=1350481924
Parts Need For Double Din / Navigation Installation:
American International FM-K552 Dash Kit - Double Din Dash Kit
fmk552.jpg?t=1350065863
Metra 70-1771 Wiring Harness - To Connect your factory 98-up Ranger harness to the Pioneer harness.
met-701771.jpg?t=1350065863
Scosche DIN Factory Radio Removal Tool - Not necessary, but recommended to remove factory radio.
dt1.jpg?t=1350065862
Dremel W/ Various Bits - To cut your bezel to allow for double DIN to slide in. I actually bought a $10 off-brand kit from Harbor Freight. It was way under-powered, but it got the job done. Took about 30 minutes to complete mine. If you have a real Dremel, it will go MUCH faster for you.
Pioneer F90BT w/ Back-Up Camera & iPod Cable
This is my Stock Double DIN MP3 Radio
I used the Metra radio removal tool to get my stock unit out. These arent necessary, but they sure made is VERY easy!
IMG_4545.jpg?t=1350481917
Stock Radio Removed from Bezel
IMG_4546.jpg?t=1350481917
You have to do some trimming to the bezel for most aftermarket double DINs to fit. Simply remove the two screws shown, and the whole thing pops out pretty easily. I found it easier to pull from the top near the AC vents.
IMG_4544.jpg?t=1350481917
To fit the new head unit, you will need to trim the top and bottom ridges as shown below. DO NOT trim the vertical sides of the bezel opening, the dash kit uses these to clip in.
IMG_4549.jpg?t=1350481919
I was extra precautious, so I used 3m tape to protect the surround from getting scratched or gouged by the dremel.
IMG_4550.jpg?t=1350481920
After using a dremel tool, this is the finished product and what yours should look like before you can install the new head unit.
IMG_4554.jpg?t=1350481919
The American International Dash Kit was very straight forward. Just attach the two side pieces to the unit with the supplied screws. Then slide it into the bezel until it "clicks" into place. You have some adjustability with this kit, I preferred the "flush" look. Once you get the desired look, tighten everything down and snap the trim surround piece over the front and your done!
IMG_4558.jpg?t=1350481921
Then you will need to take the supplied head unit harness and match it up with the Metra harness made for your vehicle. At this time, I hardwired the video "bypass" so I could have full functions while driving also.
For the Pioneer "F" Series, you just need to move the mute wire pin in the harness, and then ground it with the green wire. I used the following diagram to bypass my Pionner unit.
AVIC "F" Series Bypass (Picture Guide) - CLICK HERE
IMG_4559.jpg?t=1350481922
*Before you put everything back in the truck, you will need to run the GPS Antenna, Bluetooth Mic, Reverse Camera, iPod hookups, etc.
I did not want to run any wires outside of the truck(nor put the magnet on my paint), so I decided to mount the GPS antenna on the dash near the defrost vents. The black defrost trim simply snaps up and then you can feed the wire through the dash to the head unit. I am very happy with the location and on the way home and even in my garage I had full GPS signal.
Next I ran the Bluetooth Mic up to the sun visor. I removed the visor to run the wire through the headliner, then down the A-pillar(behind the trim), through the defrost trim just like the GPS and finally through the dash to the head unit. You cant any wires at all except where it comes out in the visor.
IMG_4574.jpg?t=1350481926
I got my head unit used and it was missing the mic clip, so I just let the visor hold it for now.
IMG_4573.jpg?t=1350481926
Next I ran the iPod hookups to the glove box.
IMG_4583.jpg?t=1350481928
I then plugged in all the wires and re-installed the bezel. Here is the finished product!
IMG_4587.jpg?t=1350481930
IMG_4585.jpg?t=1350481930
I added a little custom touch to the start up screen to give it a little more "OEM" feel.. This is the loading screen in all the new Ford vehicles with "Sync". :D
IMG_4591.jpg?t=1350481932
You can also adjust the illumination of the head unit to match the rest of your factory controls and cluster. So I made mine green to match the rest of my displays.
IMG_4569.jpg?t=1350481924
Playing through the iPod with full control from the head unit.
IMG_4567.jpg?t=1350481923
And GPS.
IMG_4570.jpg?t=1350481924
Last edited by The Twanksta; 10-17-2012 at 03:13 PM.
#2
10-17-2012
Thread Starter
|
Member
Joined: Dec 2008
Posts: 16
Likes: 1
From: FL
I still need to run a wire to the VSS sensor and reverse signal, but ran out of time and had to do some research to find the location of these wires. Someone correct me if I am wrong but this is what I have found:
Ford Ranger Vehicle Speed Sensor(VSS) Wire:
There is a GEM harness right behind the radio with a grey/black wire in it for VSS.
OR
There is a wire coming out of the pcm under the hood, also grey/black for VSS.
Ford Ranger Reverse Signal Wire:
The Reverse signal Wire is located above the fuse box kick plate on the passenger's side under the glove box. It is Green w/ Yellow Stripe.
The following users liked this post:
Stratz (08-24-2023)


Thread
Thread Starter
Forum
Replies
Last Post
korey89
Interior, Exterior, & Electrical
6
08-24-2023 11:49 AM
SteelDirigible
OLD - Interior, Exterior, Electrical, & Misc.
20
07-30-2012 06:57 PM
Redneckstone
Interior, Exterior, & Electrical
0
03-31-2010 11:18 PM


