
How-To: Rear Disc Brake Conversion on Stock 28-Spline Ranger Rear-End
#1
 10-11-2009


Join Date: Nov 2005
Location: Boring/Corvallis, Oregon
Posts: 2,011
Likes: 0
Received 2 Likes
on
2 Posts
How-To: Rear Disc Brake Conversion on Stock 28-Spline Ranger Rear-End
Mod: Rear disc brake conversion on stock 28-spline Ranger rear-end
If you are wanting to upgrade to rear disc brakes but don’t want to swap to an explorer axle setup, this is the mod for you.
Installing 94-04 Mustang rear disc brakes onto your stock 28-spline Ranger rear end is nearly a bolt on affair and very easy to preform.
Okay, this mod is only for the 28spline axles. Meaning it WONT fit if you have:
Meaning, if you ARE NOT in the list above or have NOT swapped its corresponding rear axle under your truck, you can do this swap.
Upgrading to Mustang brakes give you nearly endless possibilities in pad and rotor choices compared to Explorer rear ends. Additionally, with mustang brakes, the parking brake is over 9000 times easier to hook up than with an expo rear end. You also get the benefit to keeping your rear end if you have already invested in gears, lockers, or any maintenance (all of which you throw out with an expo swap). You also don’t have to weld on spring perches.
Within the Mustang rear disc brake conversion are two options. You can use GT/V6 or Cobra brakes. The GT/V6s are 10.5inch solid rotors, whereas the Cobras are 11.625inch vented rotors. Also note that you may have clearance problems if using 15inch wheels and the larger Cobra brakes.
To start off with, you need to obtain all of the rear brake parts off of a 94-04 Mustang.
The parts you need to get are:
Here is a picture of the Calipers (shown is a cobra caliper):

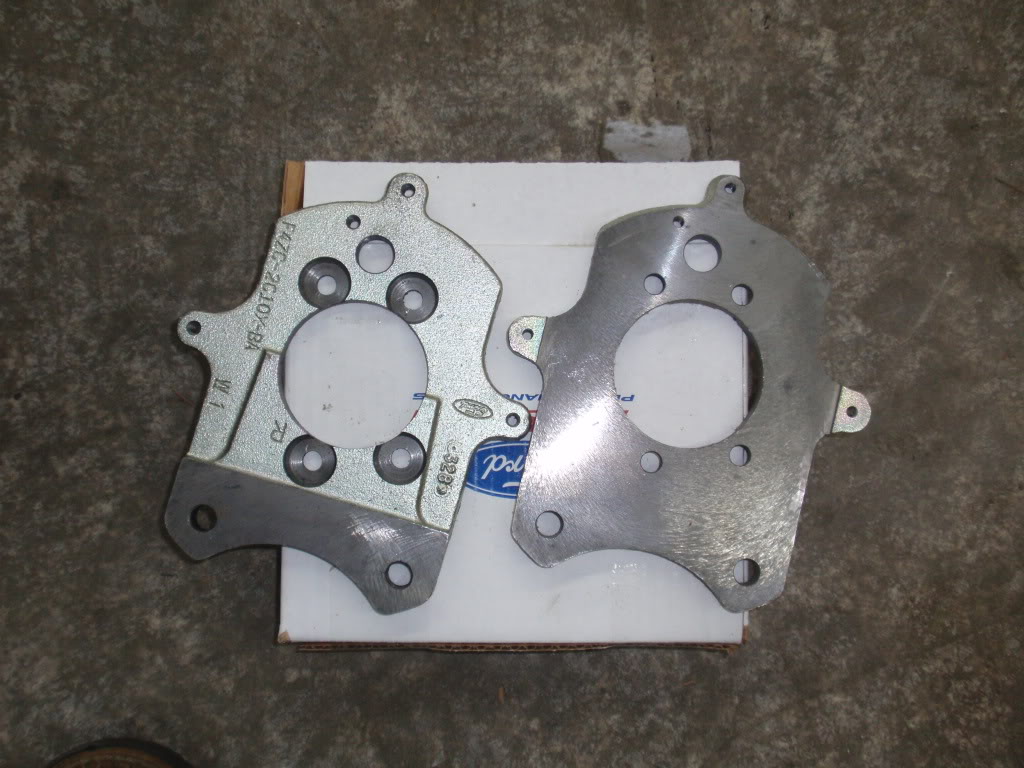
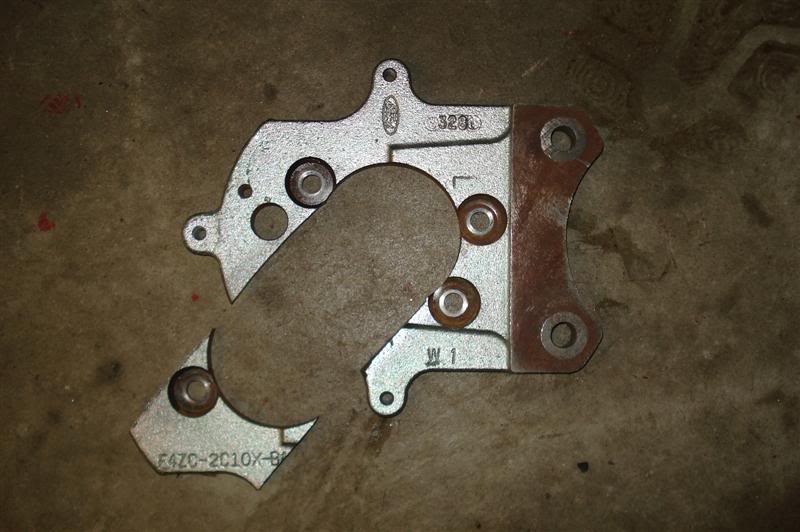
Here is a picture of the caliper bracket (the one you have to modify to bolt onto your axle):
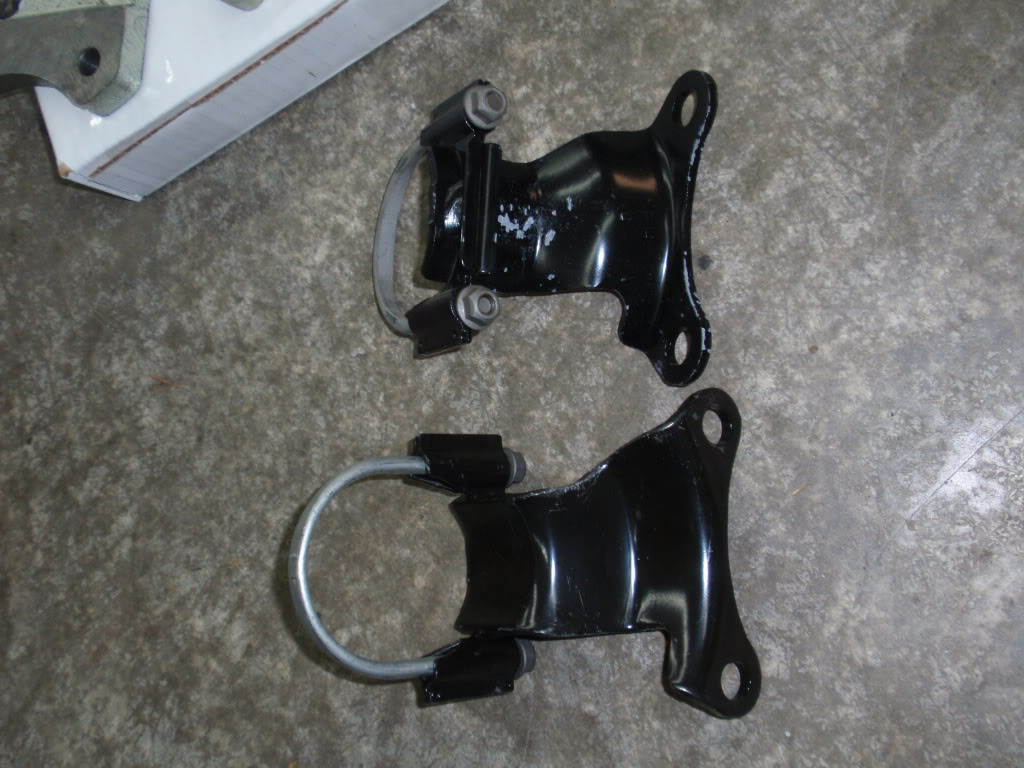
Here is a picture of the anti-moan bracket (shown is a cobra, they are taller to match the larger bracket):
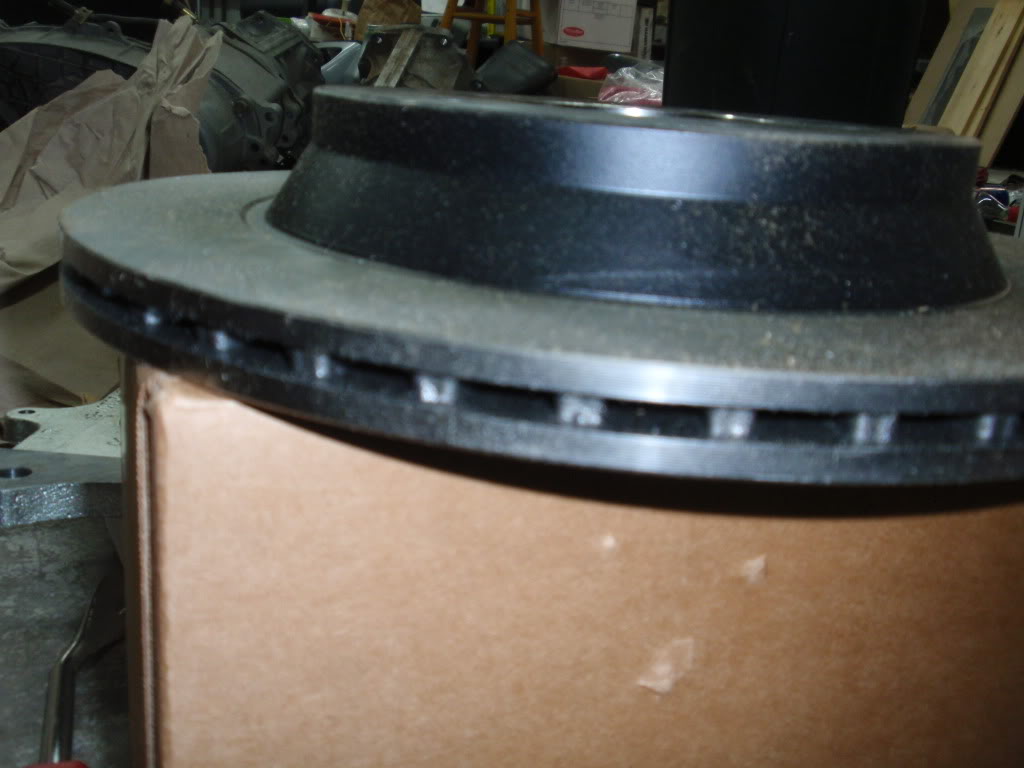
Here is a picture of the rotors:
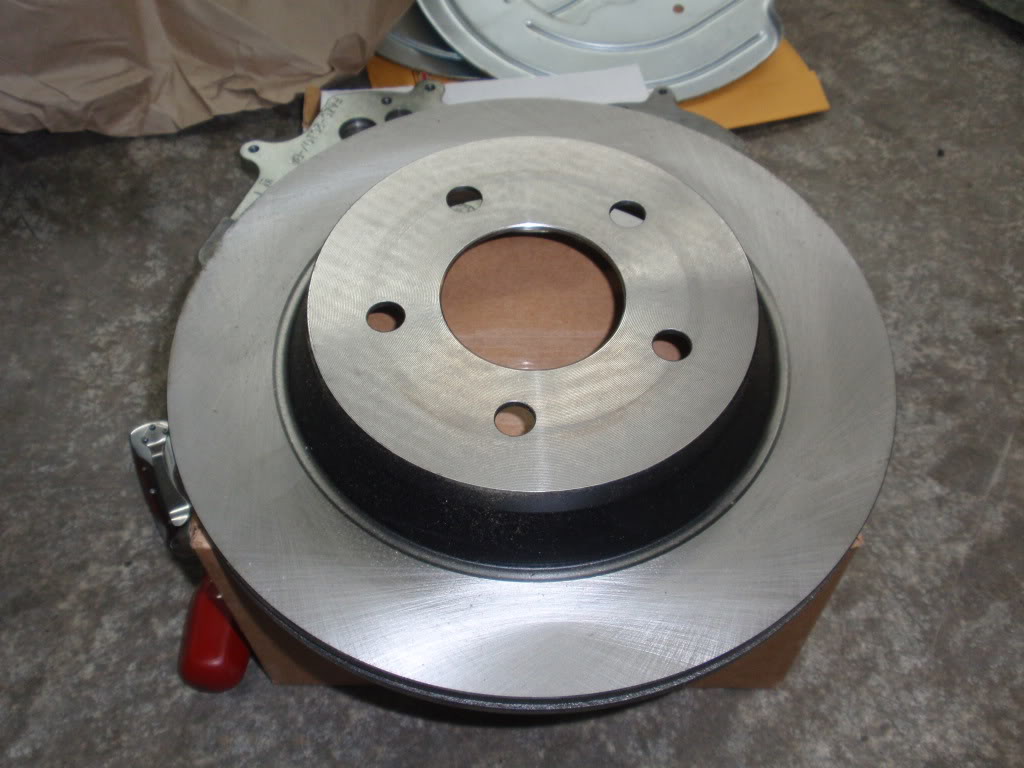
(vented Cobra rotors):
Here is a picture of the dust shields:

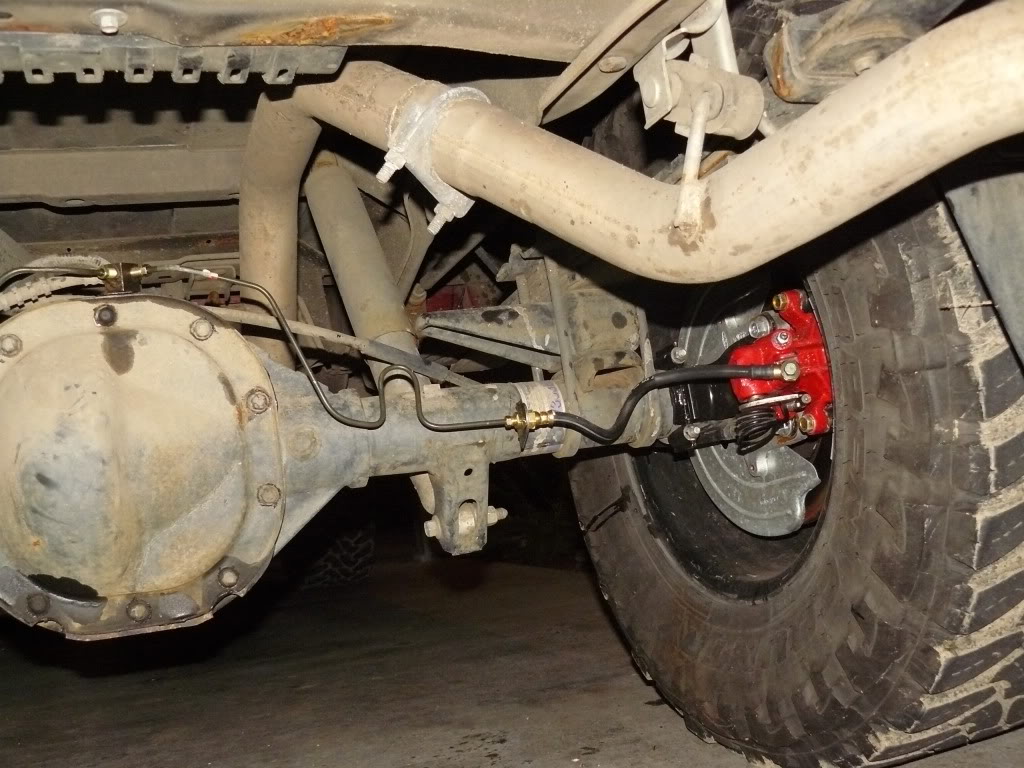
The next step is to remove your stock rear drum brakes. This means you need to put the truck up on jack-stands, remove the wheels and the drum. Then you'll need to either cut off the backing plate, or pull the axles to unbolt the backing plate. To do this, take off your diff cover, rotate until you see the small bolt holding the center pin in. Remove this and pull the center pin. Then push in the axles till they stop, and you'll see the c-clips to remove. Remove these then pull the axles out. Now unbolt the backing plate. Please note, you'll need an oil pan beneath the diff cover when you remove it, and you'll need to replace the oil once you reinstall everything.
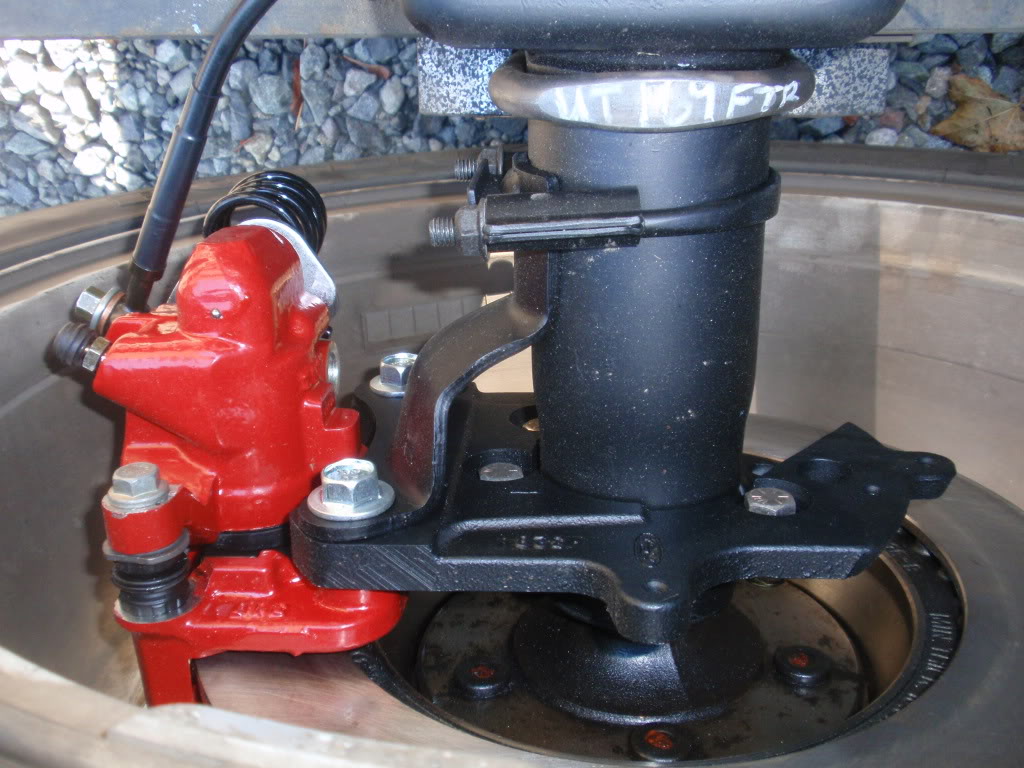
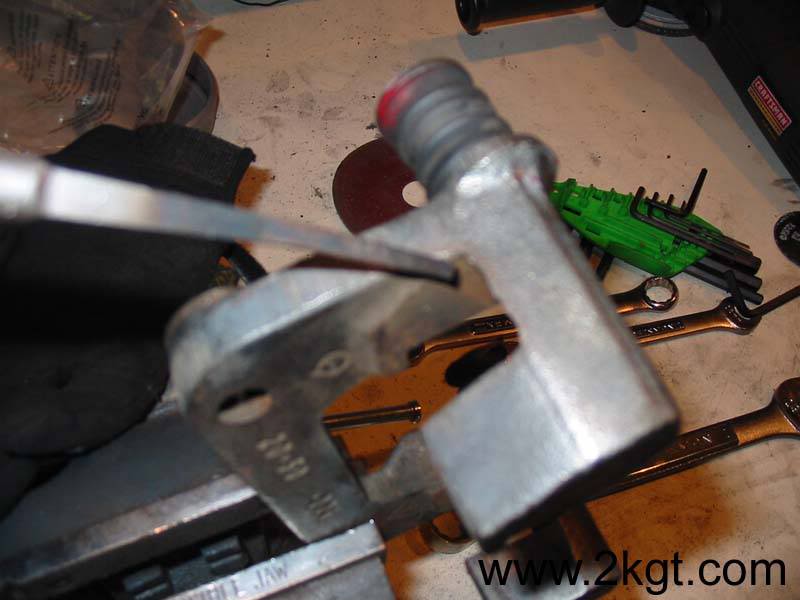
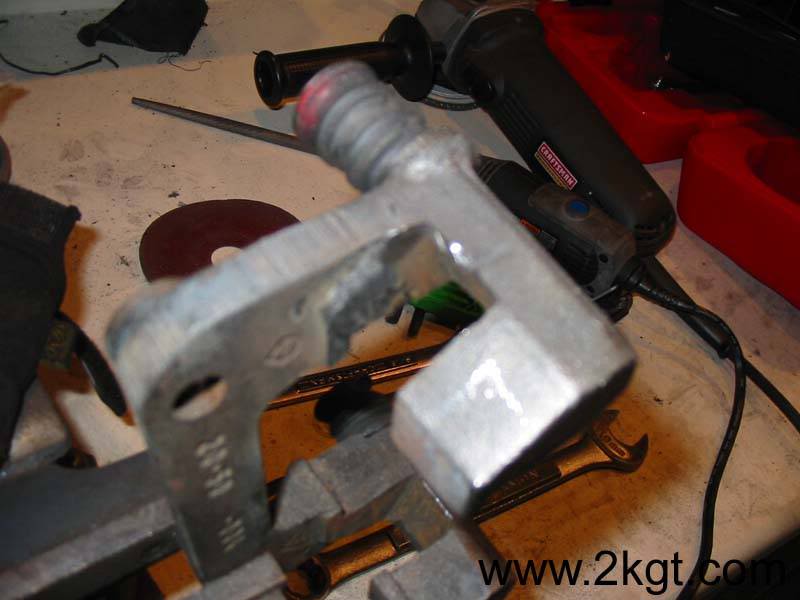
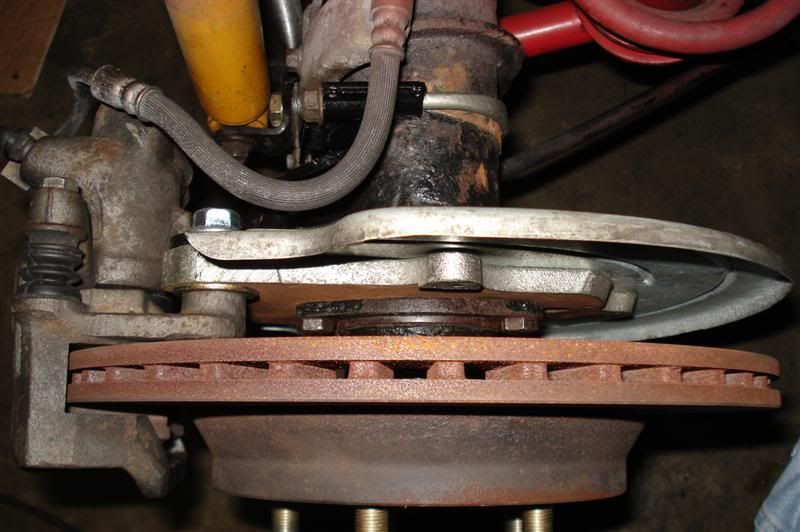
Now with the axles back in, you will need to modify the caliper bracket in order to bolt it to the inside of the axle flange.
Here are pictures in order to show where you need to cut to bolt the caliper bracket to the inside of the axle flange:


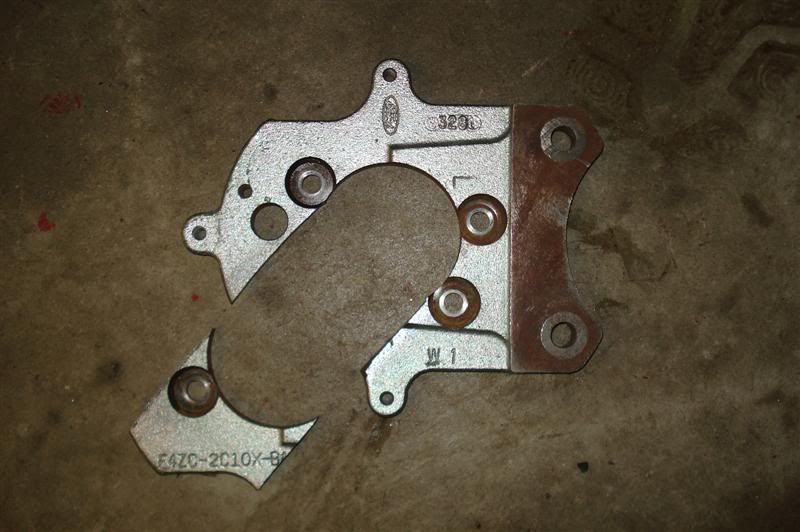
After you have modified the caliper bracket, you simply bolt it onto the axle flanges. However, after modifying you will need to bolt the Left bracket onto the right side, and the Right bracket onto the left side.

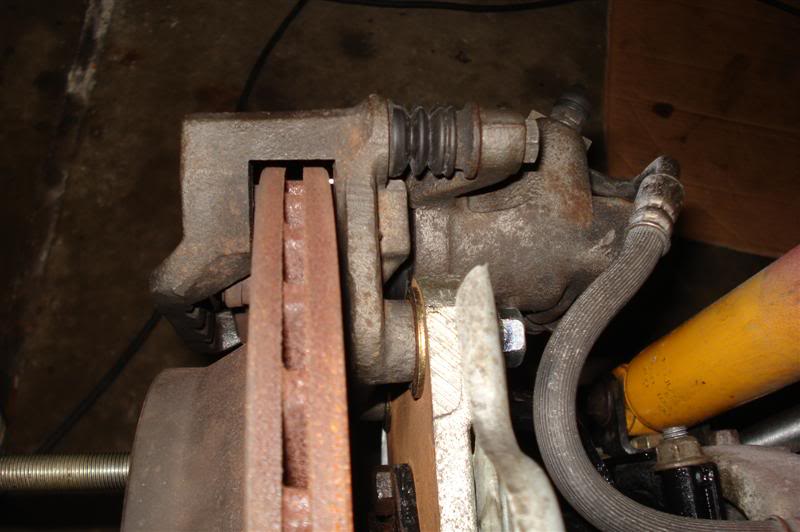
You can now slide on your rotor, attach the anti-moan bracket, and bolt the caliper up.
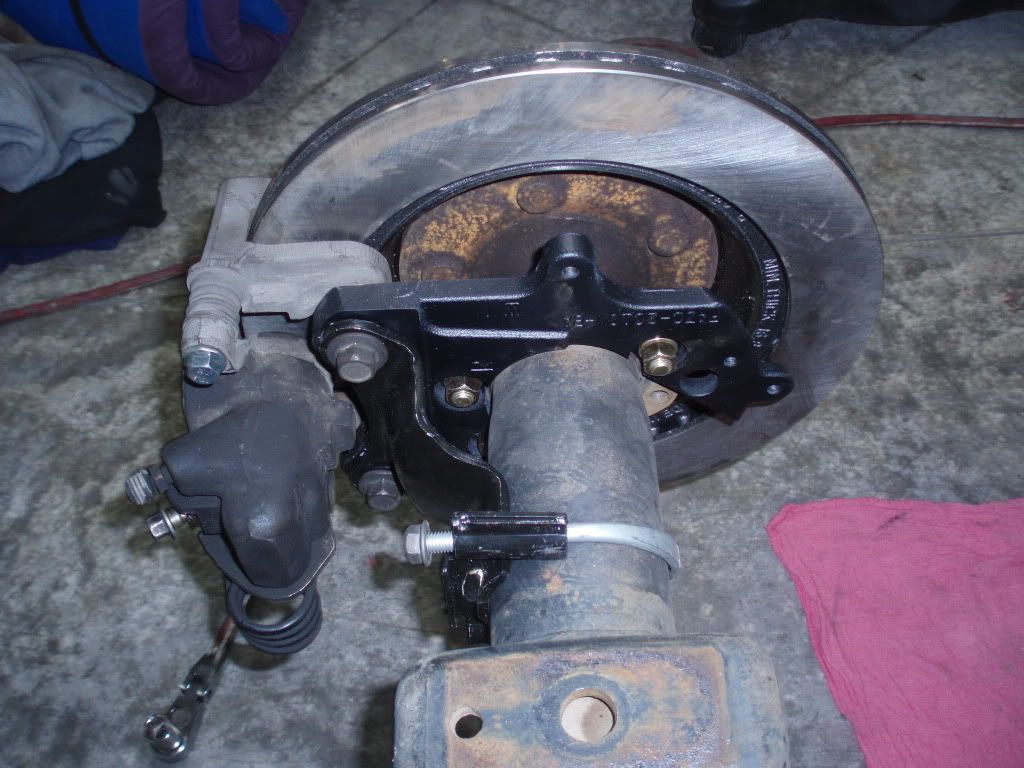
You maybe have to shim the caliper to get it perfectly centered on the rotor. Use grade 8 hardened washers to do this:

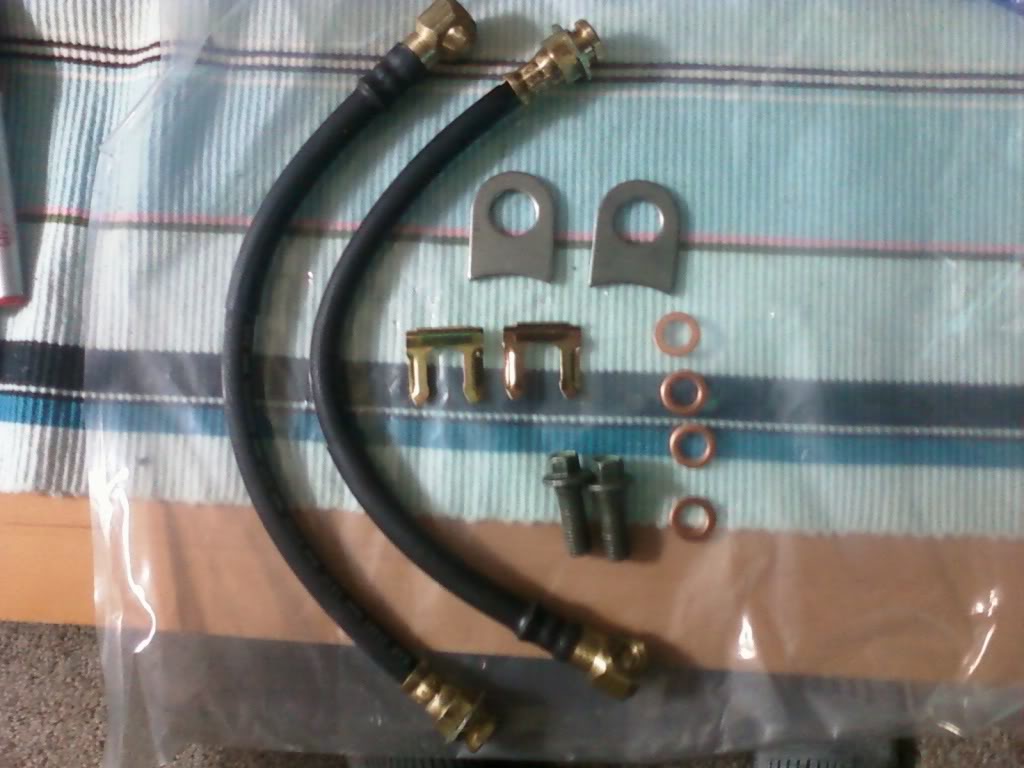
Brake lines
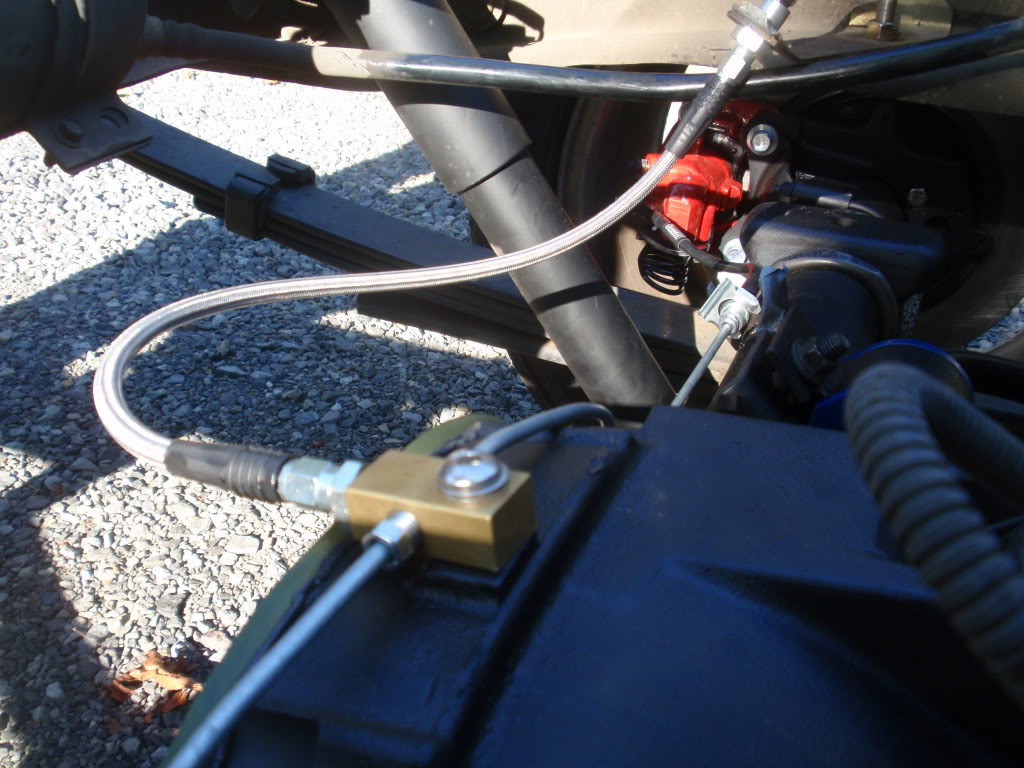
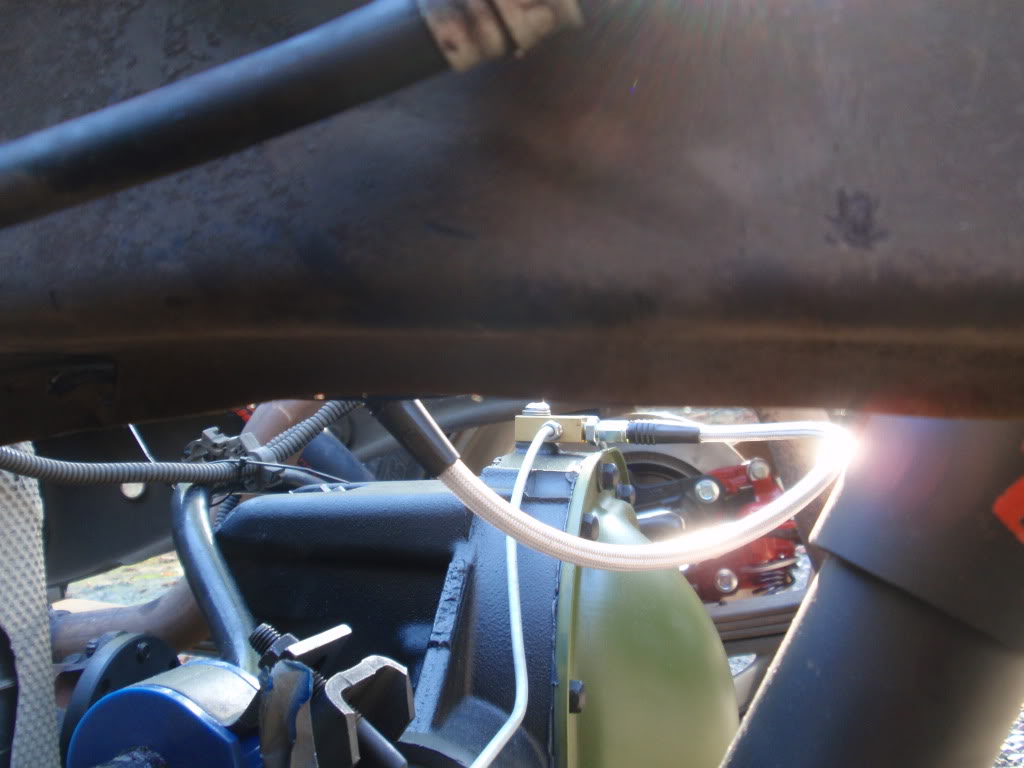
Now you need to run a soft line up to the caliper from the hardline on your axle. I went with stainless steel braided lines and bent and flared new hard lines It seems a 16-20inch universal line works great. The Ranger’s hard lines have a 3/16 tube inverted flare fittings so I have to get adapters to go to an AN-3 (the size on my SS braided lines). Then at the caliper end, it went to a 10mm banjo bolt.
This drawing helps show what you need to do:

You can also use stock mustang softlines and bend your stock hardline out of the way for a cheaper alternative.
This kit from Currie bolts on and works great. Thanks to mikerider for finding it and using it
Currie Enterprises Racing Rear End Categories
Pictured here:
And here is the kit above installed. This is how it'll look with basically any other softline installed.
Photos by mikerider:
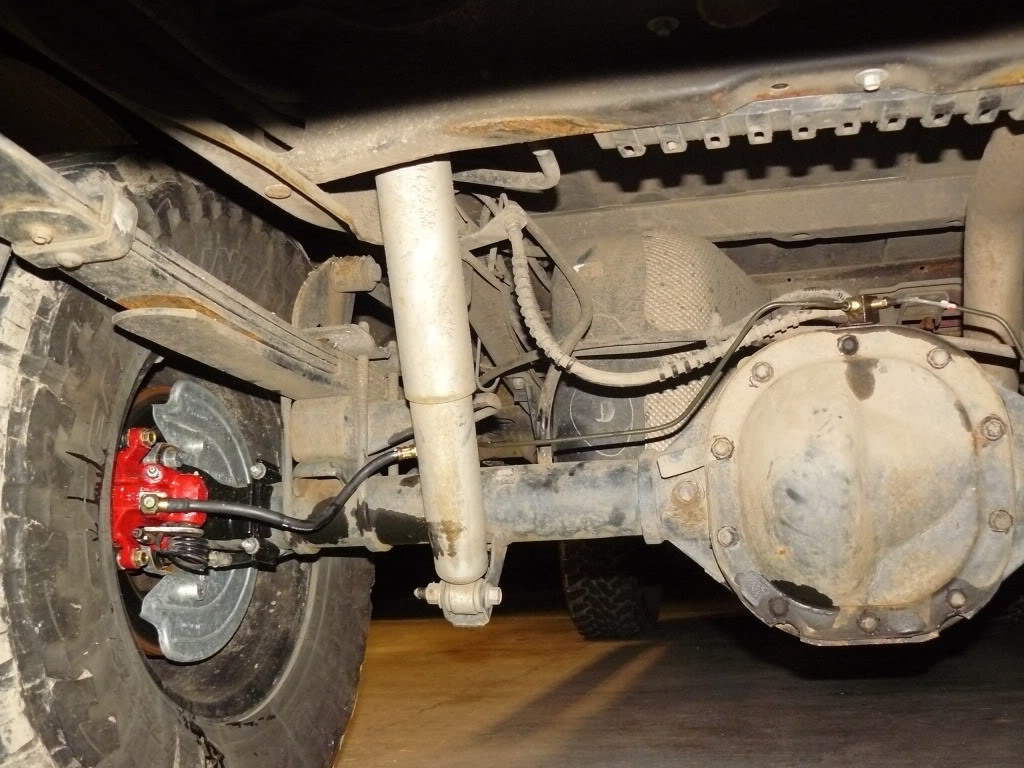
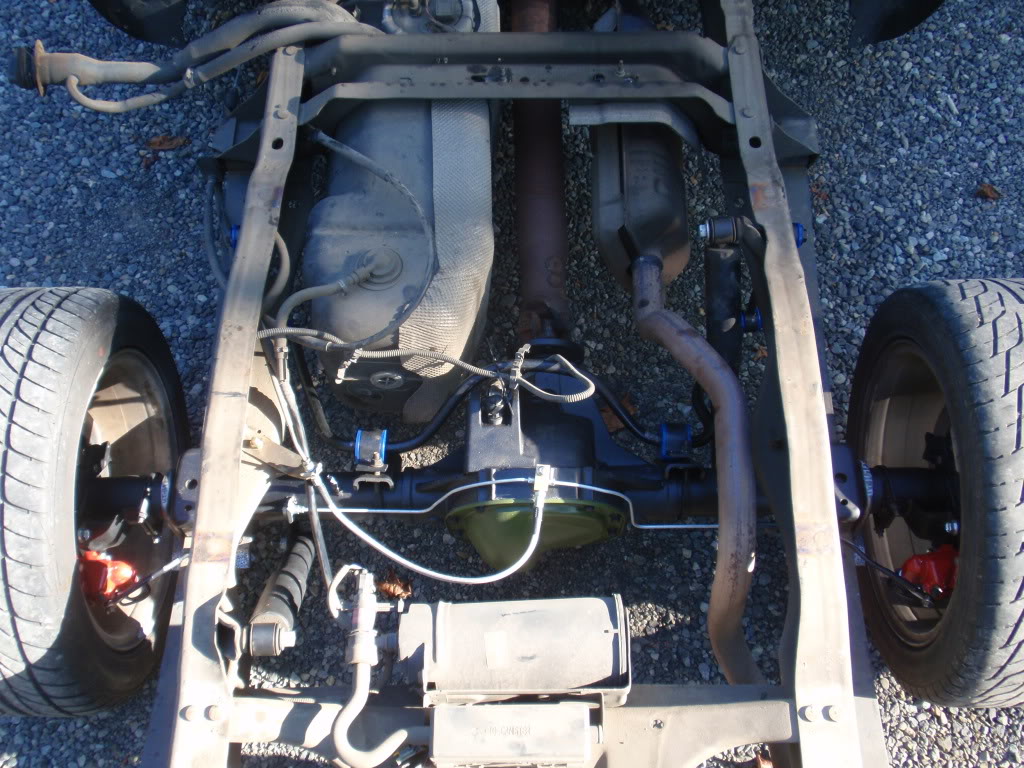
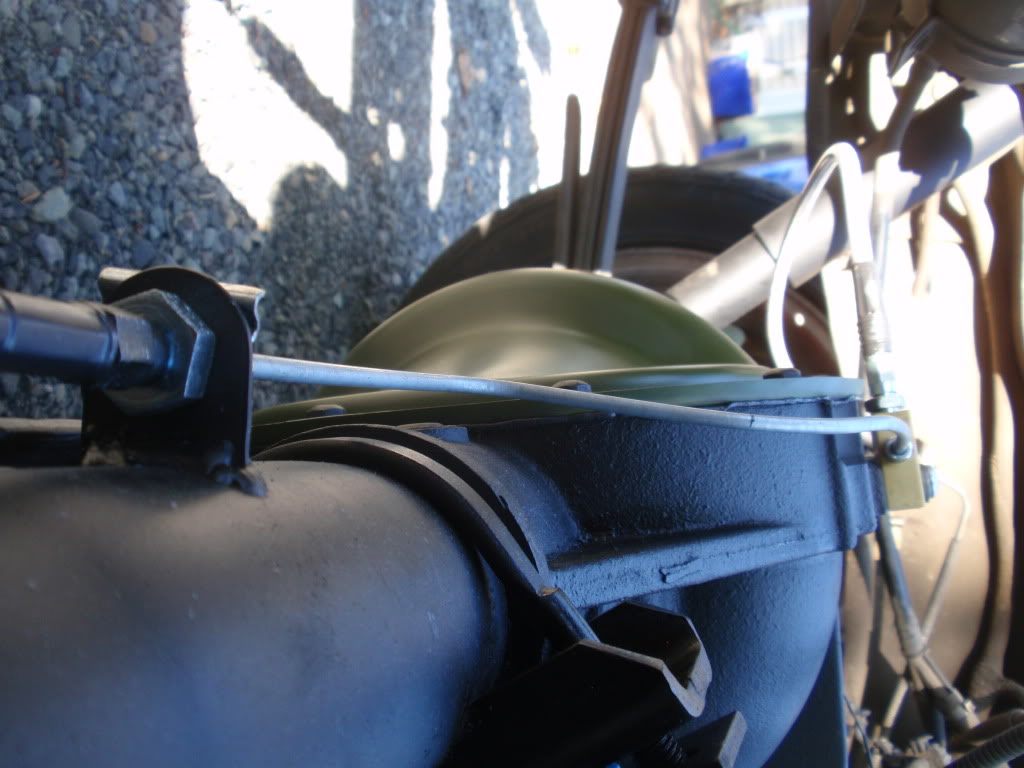
I also replaced the frame-to-axle soft line with a stainless steel braided. This is totally optional and not necessary, but i decided to do it while i was under there (this way i don't have any rubber softlines on my truck):
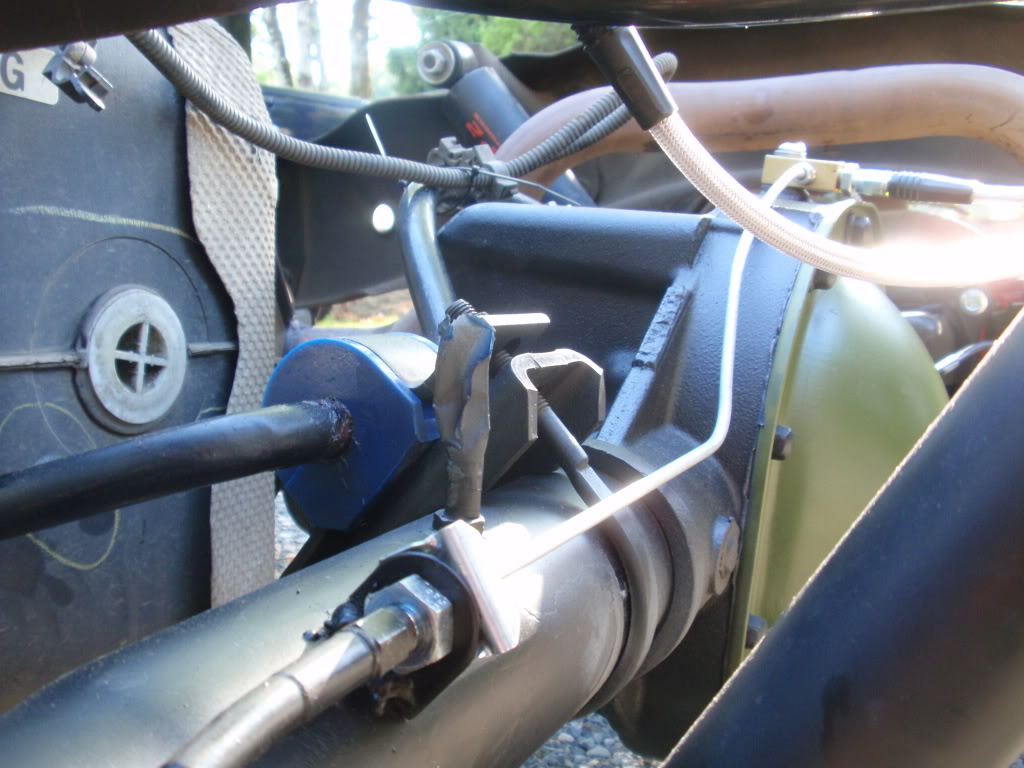

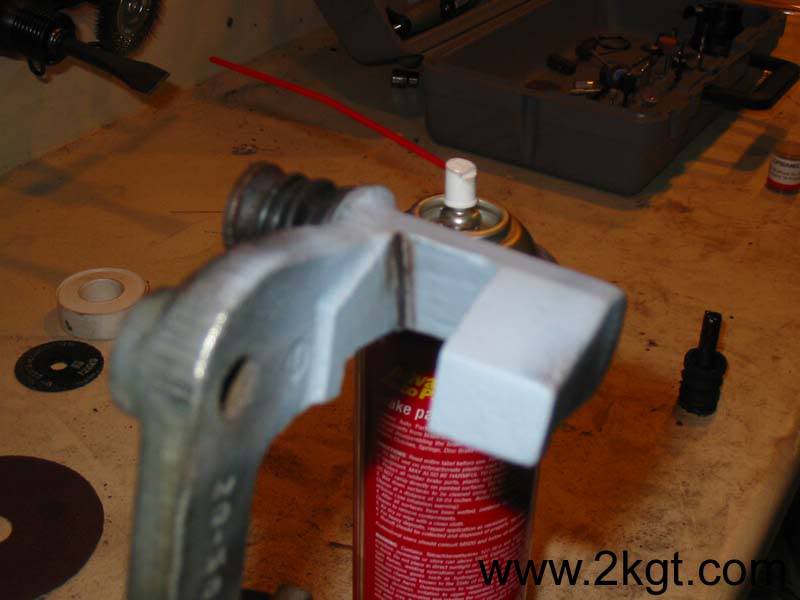
Now you need to hook up the parking brakes. This step is cake. Simply insert the cable through the hole in the caliper, and attach the ball end on the spring of the caliper. Now, slide back the protective cable outside and measure the distance to the caliper. Now cut some 1/2inch copper pipe to make up the difference. See the picture for clarity…you’ll see how it works.

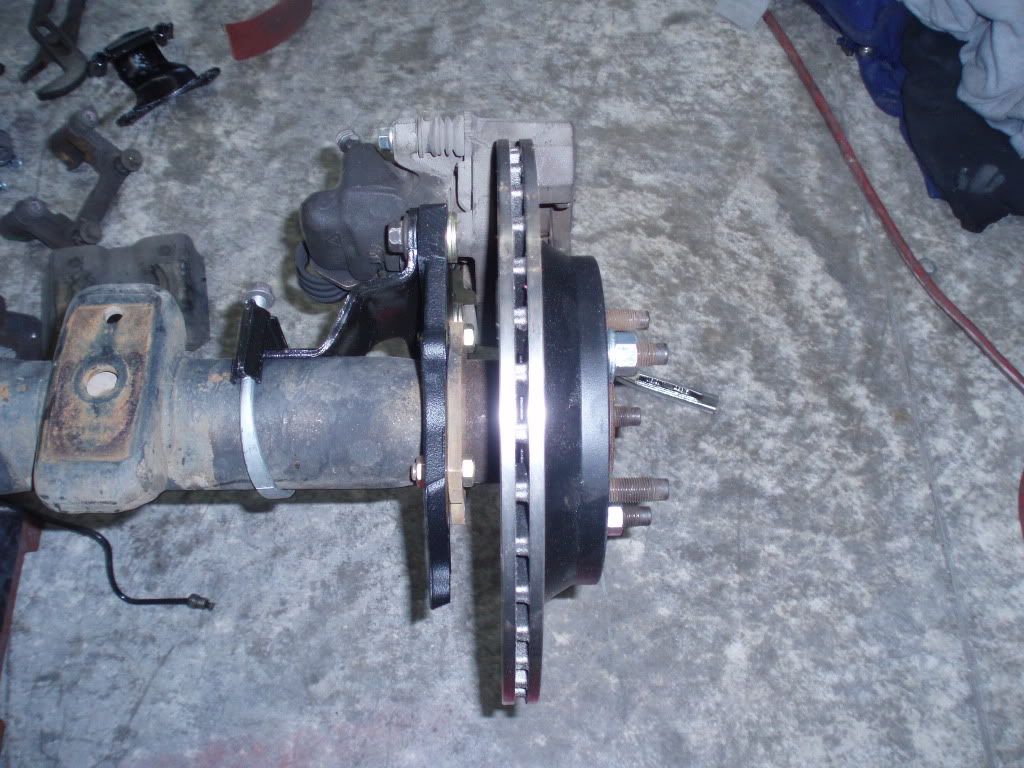
Now you need to bleed the brakes and bed them in and you’re done!
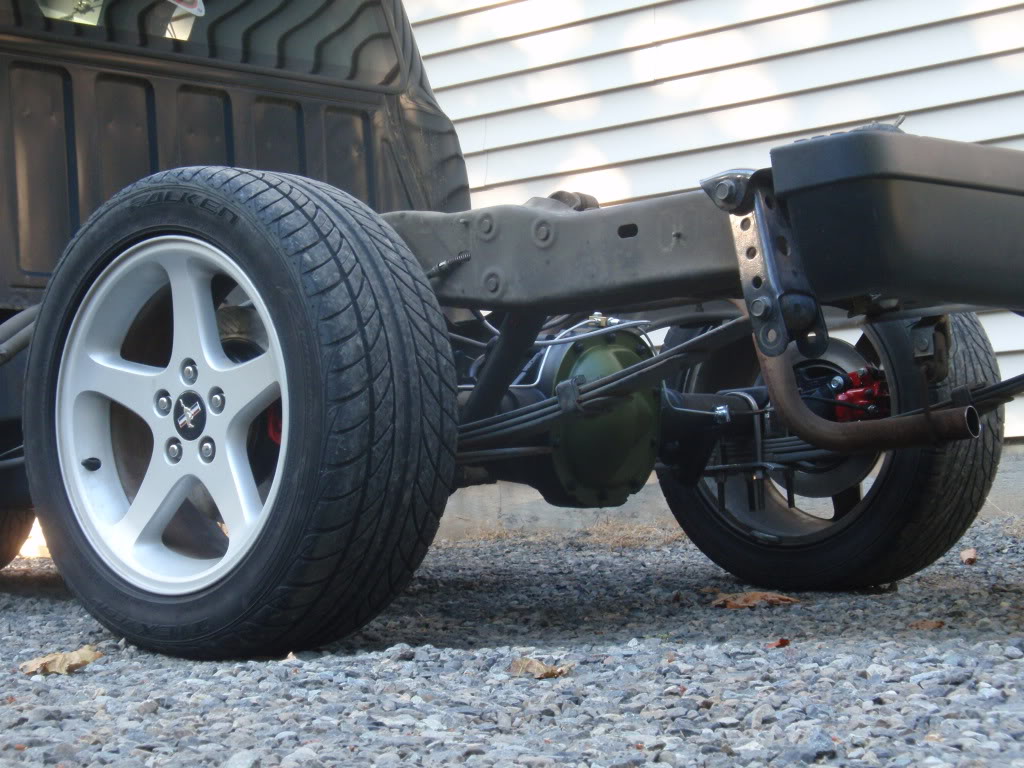
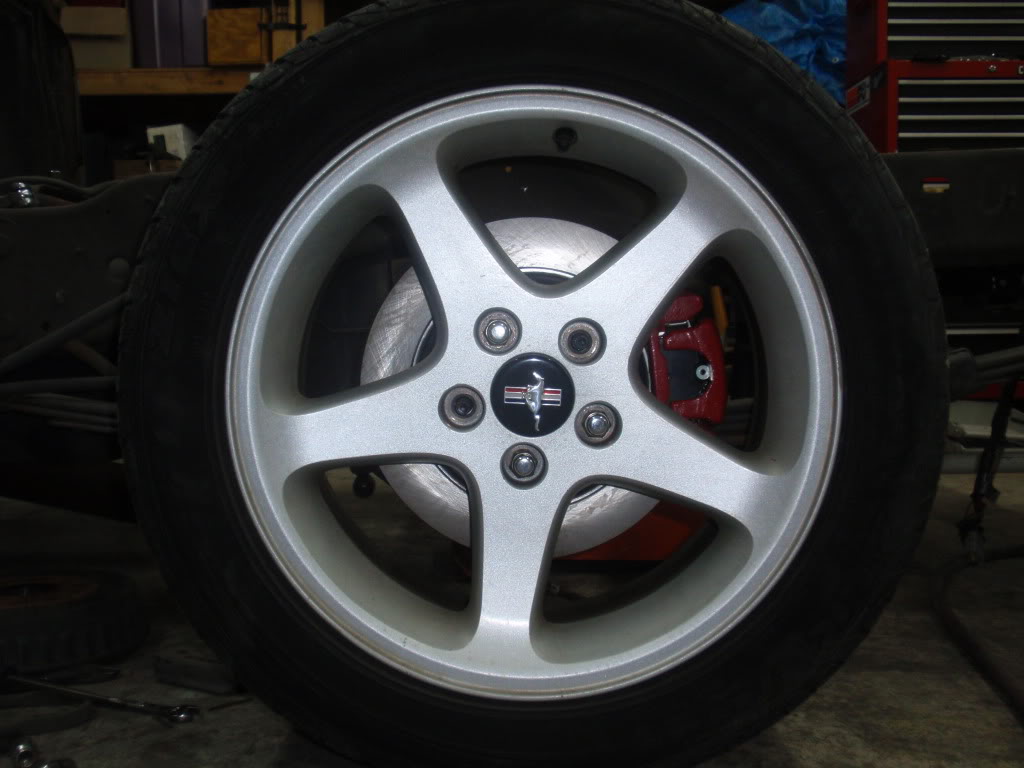
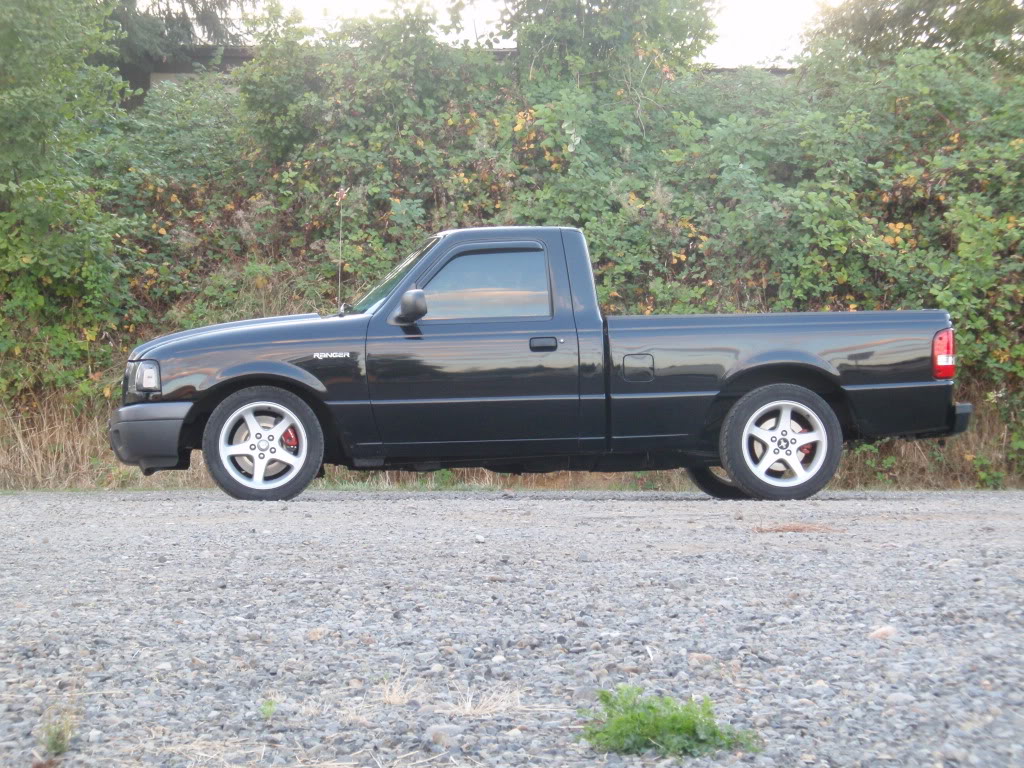
Here are my finished product:
Using GT calipers on Cobra rotors
If you find a deal on gt calipers, but want to use cobra rotors, you may find clearence issues. The cobra rotors are slightly wider (due to the venting), and sometimes hit the inside of the caliper.
To fix this problem, simple grind away the extra material show in the pictures.
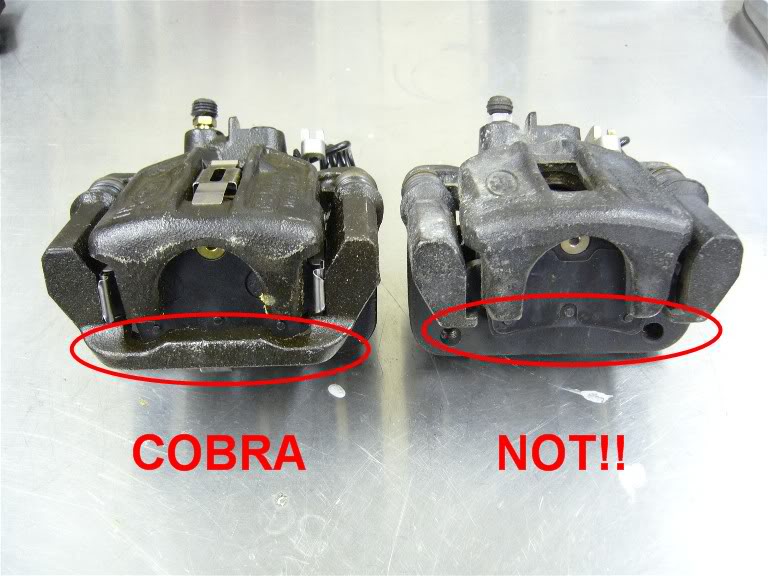
If you're not sure if you have GT of Cobra calipers, see this picture:
***In this write up, I installed the 12inch Cobra brakes onto my truck. It works great and i love it!
***This write up only works for the 28spline 8.8/7.5. If you have a 31spline FX4 axle or explorer axle, you can use this caliper bracket from Currie:
Currie Enterprises Racing Rear End Categories
If you are wanting to upgrade to rear disc brakes but don’t want to swap to an explorer axle setup, this is the mod for you.
Installing 94-04 Mustang rear disc brakes onto your stock 28-spline Ranger rear end is nearly a bolt on affair and very easy to preform.
Okay, this mod is only for the 28spline axles. Meaning it WONT fit if you have:
- 2002 FX4 Off Road
- 2003~2007 FX4 Level II (but NOT FX4 Off Road)
- 2008~2009 FX4 Off Road (only when equipped with the "XR8" option - Torsen diff/31-spline/4.10 ratio).
Meaning, if you ARE NOT in the list above or have NOT swapped its corresponding rear axle under your truck, you can do this swap.
Upgrading to Mustang brakes give you nearly endless possibilities in pad and rotor choices compared to Explorer rear ends. Additionally, with mustang brakes, the parking brake is over 9000 times easier to hook up than with an expo rear end. You also get the benefit to keeping your rear end if you have already invested in gears, lockers, or any maintenance (all of which you throw out with an expo swap). You also don’t have to weld on spring perches.
Within the Mustang rear disc brake conversion are two options. You can use GT/V6 or Cobra brakes. The GT/V6s are 10.5inch solid rotors, whereas the Cobras are 11.625inch vented rotors. Also note that you may have clearance problems if using 15inch wheels and the larger Cobra brakes.
To start off with, you need to obtain all of the rear brake parts off of a 94-04 Mustang.
The parts you need to get are:
- Calipers (either GT or Cobra)
- Rotors (model specific)
- Pads (model specific)
- Caliper brackets (model specific)
- Anti-moan brackets (optional, some don't use it)(model specific)
- Dust shield (optional, most don't run them )(model specific)
- Brake lines soft/hard(covered in detail below)
Here is a picture of the Calipers (shown is a cobra caliper):
Here is a picture of the caliper bracket (the one you have to modify to bolt onto your axle):
Here is a picture of the anti-moan bracket (shown is a cobra, they are taller to match the larger bracket):
Here is a picture of the rotors:
(vented Cobra rotors):
Here is a picture of the dust shields:
The next step is to remove your stock rear drum brakes. This means you need to put the truck up on jack-stands, remove the wheels and the drum. Then you'll need to either cut off the backing plate, or pull the axles to unbolt the backing plate. To do this, take off your diff cover, rotate until you see the small bolt holding the center pin in. Remove this and pull the center pin. Then push in the axles till they stop, and you'll see the c-clips to remove. Remove these then pull the axles out. Now unbolt the backing plate. Please note, you'll need an oil pan beneath the diff cover when you remove it, and you'll need to replace the oil once you reinstall everything.
Now with the axles back in, you will need to modify the caliper bracket in order to bolt it to the inside of the axle flange.
Here are pictures in order to show where you need to cut to bolt the caliper bracket to the inside of the axle flange:
After you have modified the caliper bracket, you simply bolt it onto the axle flanges. However, after modifying you will need to bolt the Left bracket onto the right side, and the Right bracket onto the left side.
You can now slide on your rotor, attach the anti-moan bracket, and bolt the caliper up.
You maybe have to shim the caliper to get it perfectly centered on the rotor. Use grade 8 hardened washers to do this:
Brake lines
Now you need to run a soft line up to the caliper from the hardline on your axle. I went with stainless steel braided lines and bent and flared new hard lines It seems a 16-20inch universal line works great. The Ranger’s hard lines have a 3/16 tube inverted flare fittings so I have to get adapters to go to an AN-3 (the size on my SS braided lines). Then at the caliper end, it went to a 10mm banjo bolt.
This drawing helps show what you need to do:
You can also use stock mustang softlines and bend your stock hardline out of the way for a cheaper alternative.
This kit from Currie bolts on and works great. Thanks to mikerider for finding it and using it
Currie Enterprises Racing Rear End Categories
Pictured here:
And here is the kit above installed. This is how it'll look with basically any other softline installed.
Photos by mikerider:
I also replaced the frame-to-axle soft line with a stainless steel braided. This is totally optional and not necessary, but i decided to do it while i was under there (this way i don't have any rubber softlines on my truck):
Now you need to hook up the parking brakes. This step is cake. Simply insert the cable through the hole in the caliper, and attach the ball end on the spring of the caliper. Now, slide back the protective cable outside and measure the distance to the caliper. Now cut some 1/2inch copper pipe to make up the difference. See the picture for clarity…you’ll see how it works.
Now you need to bleed the brakes and bed them in and you’re done!
Here are my finished product:
Using GT calipers on Cobra rotors
If you find a deal on gt calipers, but want to use cobra rotors, you may find clearence issues. The cobra rotors are slightly wider (due to the venting), and sometimes hit the inside of the caliper.
To fix this problem, simple grind away the extra material show in the pictures.
If you're not sure if you have GT of Cobra calipers, see this picture:
***In this write up, I installed the 12inch Cobra brakes onto my truck. It works great and i love it!
***This write up only works for the 28spline 8.8/7.5. If you have a 31spline FX4 axle or explorer axle, you can use this caliper bracket from Currie:
Currie Enterprises Racing Rear End Categories
Last edited by KLC; 11-18-2011 at 10:15 PM.

#3
11-23-2009
Join Date: Nov 2005
Location: Boring/Corvallis, Oregon
Posts: 2,011
Likes: 0
Received 2 Likes
on
2 Posts
The rear uses 3 smaller bolts, and teh front uses 2 bigger bolts.
Total cross sectional area for the front is .3506in^2
Total cross sectional area for the rear bolts is .3313in^2
So as you can see, the rear has slightly smaller cross sectional area, and thus can handle slightly less force than the fronts before they'll break. But we all know that ain't going to happen, so we are legitimately safe here using only 3 bolt holes as the rear doesn't do the brunt force of the braking.
#4
11-25-2009
Join Date: Nov 2005
Location: Boring/Corvallis, Oregon
Posts: 2,011
Likes: 0
Received 2 Likes
on
2 Posts
Just a heads up when you install it all. The caliper piston has to be turned in, not pressed in to get enough clearance for the pads and rotor to fit in it. There is a special tool which has the correct pins to fit teh caliper so you can twist it, but needle nose pliers can work if you are in a pinch. lol. I need to buy the tool....


#6
12-21-2009
Join Date: Nov 2005
Location: Boring/Corvallis, Oregon
Posts: 2,011
Likes: 0
Received 2 Likes
on
2 Posts
ADAPTER, CALIPER TO AXLE L.R. F4ZZ-2C101-B
and
ADAPTER, CALIPER TO AXLE R.R. F4ZZ-2C100-B
Those are teh cobra brackets. idk what the gt/v6 ones are.
#7
12-22-2009
Ford Racing Performance Parts
M2300M GT Rear Brake Kit - Kit includes mounting plates for caliper brackets, dust shields (with mounting bolts (6x), 2x Mustang Cobra Discs, and anti moan brackets.
Price: $154.00 plus 18 shipped plus I got a couple other heavy items
Either Mustang Cobra GT or Cobra Calipers and Caliper Brackets
Tousley Ford Parts Department: 1-651-484-8888 YOU MUST ASK FOR STEVE POWELL to get the discount.
Dorman Parts
Dorman Part # H381390 - Right Rear Brake Hose
Dorman Part # H381283 - Left Rear Brake Hose
Wagner Brake Pads (Brand may vary by choice)
Wagner Part # PD627A - ThermoQuiet Mustang Cobra Brake Pads (Thinner than GT Brake Pads)
Mobile 1 Gear Lube
4 Qts Mobil 1 75W-90 Synthetic Gear Lube or
Optional Parts
Ford Parts
D8BZ4241C - Locking Pin for Rear Spider Blocks
F4ZZ-2C101-B - Mustang Cobra Left Rear Caliper Mounting Bracket
F4ZZ-2C100-B - Mustang Cobra Right Rear Caliper Mounting Bracket
Dorman Parts
Dorman Part # 13937 - Rear Course Threaded Banjo Bolt for 2001-2004 Mustang Rear Discs
Dorman Part # HW5618 - Disc Brake Hardware Kit
Dorman Part # 13898 - Caliper Bracket Mounting Bolt
Notes
Luckily my Dorman brake flex hoses came with the banjo bolts and copper crush brass rings. Unfortunately, I had already looked up the part numbers and did all the research. I scored some low mileage Mustang GT calipers off of ebay for $50.00. I had to buy the flex lines/soft brake hoses, hardware kit, and the bracket mounting bolts. Price will depend a lot on what kind of deals you can get.
The Mustang GT and Cobra calipers are almost identical. You may have to grind some of the Mustang GT caliper bracket off to clear the Cobra disc but that's not a big deal. Another option if you don't want to grind the caliper bracket is to go with a Mustang GT non-vented rotor with Mustang GT brake pads. You can always sell the Cobra vented discs on here or ebay.
Are you talking about 8 SAE or metric class 8.8? A metric class 8.8 is similiar to SAE Grade 5. Personally, I would look for a class 10.9 bolt. http://www.k-tbolt.com/bolt_chart.html
M2300M GT Rear Brake Kit - Kit includes mounting plates for caliper brackets, dust shields (with mounting bolts (6x), 2x Mustang Cobra Discs, and anti moan brackets.
Price: $154.00 plus 18 shipped plus I got a couple other heavy items
Either Mustang Cobra GT or Cobra Calipers and Caliper Brackets
Tousley Ford Parts Department: 1-651-484-8888 YOU MUST ASK FOR STEVE POWELL to get the discount.
Dorman Parts
Dorman Part # H381390 - Right Rear Brake Hose
Dorman Part # H381283 - Left Rear Brake Hose
Wagner Brake Pads (Brand may vary by choice)
Wagner Part # PD627A - ThermoQuiet Mustang Cobra Brake Pads (Thinner than GT Brake Pads)
Mobile 1 Gear Lube
4 Qts Mobil 1 75W-90 Synthetic Gear Lube or
Optional Parts
Ford Parts
D8BZ4241C - Locking Pin for Rear Spider Blocks
F4ZZ-2C101-B - Mustang Cobra Left Rear Caliper Mounting Bracket
F4ZZ-2C100-B - Mustang Cobra Right Rear Caliper Mounting Bracket
Dorman Parts
Dorman Part # 13937 - Rear Course Threaded Banjo Bolt for 2001-2004 Mustang Rear Discs
Dorman Part # HW5618 - Disc Brake Hardware Kit
Dorman Part # 13898 - Caliper Bracket Mounting Bolt
Notes
Luckily my Dorman brake flex hoses came with the banjo bolts and copper crush brass rings. Unfortunately, I had already looked up the part numbers and did all the research. I scored some low mileage Mustang GT calipers off of ebay for $50.00. I had to buy the flex lines/soft brake hoses, hardware kit, and the bracket mounting bolts. Price will depend a lot on what kind of deals you can get.
The Mustang GT and Cobra calipers are almost identical. You may have to grind some of the Mustang GT caliper bracket off to clear the Cobra disc but that's not a big deal. Another option if you don't want to grind the caliper bracket is to go with a Mustang GT non-vented rotor with Mustang GT brake pads. You can always sell the Cobra vented discs on here or ebay.
Last edited by Hillyard; 12-22-2009 at 11:01 PM.
#8
06-02-2010
Join Date: Nov 2005
Location: Boring/Corvallis, Oregon
Posts: 2,011
Likes: 0
Received 2 Likes
on
2 Posts
Has anyone confirmed the axle bracket differences between the GT and Cobra? I gather that with the GT caliper bracket the brake pads don't have a full grab on the rotors. What brackets would push the caliper inward enough to grab the smaller GT rotors? Is it the axle bracket or the caliper bracket?
Any input before I buy a set??
GB :)
Any input before I buy a set??
GB :)
You can mix and match the calipers. however, you might need to file clearance for the rotors if you put a gt caliper on a cobra rotor (the cobra rotor is slightly thicker, and its corresponding caliper has build in clearance...clearance the gt caliper doesn't have but you can make it with a grinder/file).
Hope this helps!
#9
08-31-2010
Join Date: Nov 2005
Location: Boring/Corvallis, Oregon
Posts: 2,011
Likes: 0
Received 2 Likes
on
2 Posts
Shoot, that is what happens when you're lazy and use someone else's pictures hosted online.
Looks like someone needs to buy me a few 4-loko's and i'll go through and finish this write up for gud and complete....
They'lll look like this guy:

And put left bracekt onto right bracket and vice-a-versa:

And you might have to shim the caliper like so with a grade 8 washer:
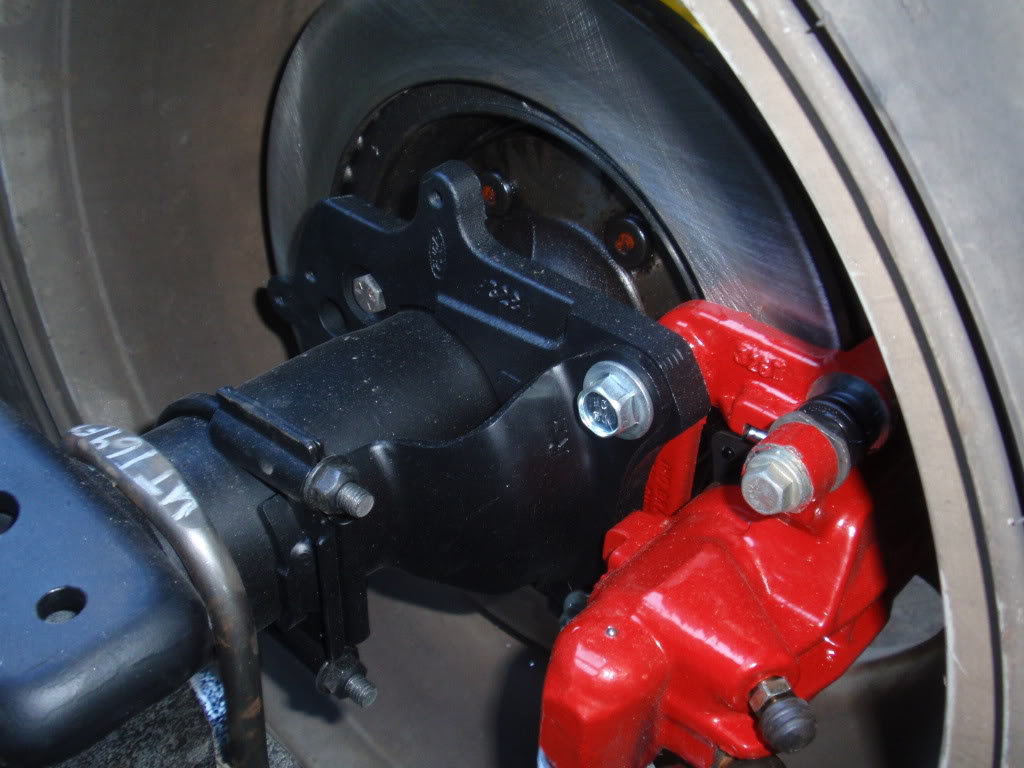
Completed, dust cover optional:
Looks like someone needs to buy me a few 4-loko's and i'll go through and finish this write up for gud and complete....
They'lll look like this guy:
And put left bracekt onto right bracket and vice-a-versa:
And you might have to shim the caliper like so with a grade 8 washer:
Completed, dust cover optional:
#10
11-28-2010
Got my swap done on friday, brake pedal is still a little soft so more bleeding will happen soon, I think I am not getting a good seal on the brake lines.
Right now I am running bent stock hardlines with adapters to stock cobra lines but I ordered a set of these yesterday and they should solve the situation
Currie Enterprises Racing Rear End Categories
Then I will just have to pick up some shorter hard lines and get everything sorted out.
For those worried about the pulling the axle shafts its real easy and strait forward. The hardest part was filling the diff back up.
#11
12-02-2010
Join Date: Nov 2005
Location: Boring/Corvallis, Oregon
Posts: 2,011
Likes: 0
Received 2 Likes
on
2 Posts
There seems to be mass confusion on what you need for brake lines. Seriously, just think about it, its not that hard.
Here is a little thing i drew up that shows what to do. Either pick stock soft lines, or go with SS braided lines. i went with SS braided lines. It is easiest by far.

And that adapter in the picture is used with brake line tabs to mount it to your axle or spring perch or whatever. It clips in just like the stock hardline to softline adapter do.
Here is a little thing i drew up that shows what to do. Either pick stock soft lines, or go with SS braided lines. i went with SS braided lines. It is easiest by far.
And that adapter in the picture is used with brake line tabs to mount it to your axle or spring perch or whatever. It clips in just like the stock hardline to softline adapter do.
#12
12-02-2010
Join Date: Nov 2005
Location: Boring/Corvallis, Oregon
Posts: 2,011
Likes: 0
Received 2 Likes
on
2 Posts
And if you decide to cut your hardlines, reflaring isn't all that hard. Just make sure to use some brake fluid to lube the tool up. The tools are about $20, and they will usually come with standard plumbing 45* single flare, and then the die to do a brake or fuel 45* inverted (or double flare as its sometimes called.
#14
02-04-2012

Join Date: Jan 2012
Location: houston, tx
Posts: 5
Likes: 0
Received 0 Likes
on
0 Posts
Modify Brackets?
Just comparing the photos from your build to the photos from the Ford racing bracket kit after receiving my parts today...
It looks like your build has the brackets(part numbers and stamping, ect) facing inward (opposite of the direction indicated in the install instructions) and the bracket is mounted behind the axle flange plate.
In the instructions the bracket mounts to the outside of the axle flange plate with stamping facing outward (exact opposite).
Now I realize the instructions are for the Mustang and we are adapting the kit for the Ranger, but I am not sure how different the two axle flanges are to make it necessary to cut the bracket.
Couldn't we just mount the bracket unaltered in the same manner as the Mustang? the bolt pattern appears to be the same. I am guessing there is probably a good reason, but perhaps you could enlighten me.
Thanks for being a pioneer to adapt the parts in the first place. Putting this tutorial together makes it much easier for others to work on their rides.
Cheers,
#15
02-04-2012
Just comparing the photos from your build to the photos from the Ford racing bracket kit after receiving my parts today...
It looks like your build has the brackets(part numbers and stamping, ect) facing inward (opposite of the direction indicated in the install instructions) and the bracket is mounted behind the axle flange plate.
In the instructions the bracket mounts to the outside of the axle flange plate with stamping facing outward (exact opposite).
Now I realize the instructions are for the Mustang and we are adapting the kit for the Ranger, but I am not sure how different the two axle flanges are to make it necessary to cut the bracket.
Couldn't we just mount the bracket unaltered in the same manner as the Mustang? the bolt pattern appears to be the same. I am guessing there is probably a good reason, but perhaps you could enlighten me.
Thanks for being a pioneer to adapt the parts in the first place. Putting this tutorial together makes it much easier for others to work on their rides.
Cheers,
It looks like your build has the brackets(part numbers and stamping, ect) facing inward (opposite of the direction indicated in the install instructions) and the bracket is mounted behind the axle flange plate.
In the instructions the bracket mounts to the outside of the axle flange plate with stamping facing outward (exact opposite).
Now I realize the instructions are for the Mustang and we are adapting the kit for the Ranger, but I am not sure how different the two axle flanges are to make it necessary to cut the bracket.
Couldn't we just mount the bracket unaltered in the same manner as the Mustang? the bolt pattern appears to be the same. I am guessing there is probably a good reason, but perhaps you could enlighten me.
Thanks for being a pioneer to adapt the parts in the first place. Putting this tutorial together makes it much easier for others to work on their rides.
Cheers,
If you really don't want to cut brackets you can get offset brackets from a few companies that mount on the outside of the axle flange.
#16
02-05-2012
Just comparing the photos from your build to the photos from the Ford racing bracket kit after receiving my parts today...
It looks like your build has the brackets(part numbers and stamping, ect) facing inward (opposite of the direction indicated in the install instructions) and the bracket is mounted behind the axle flange plate.
In the instructions the bracket mounts to the outside of the axle flange plate with stamping facing outward (exact opposite).
Now I realize the instructions are for the Mustang and we are adapting the kit for the Ranger, but I am not sure how different the two axle flanges are to make it necessary to cut the bracket.
Couldn't we just mount the bracket unaltered in the same manner as the Mustang? the bolt pattern appears to be the same. I am guessing there is probably a good reason, but perhaps you could enlighten me.
Thanks for being a pioneer to adapt the parts in the first place. Putting this tutorial together makes it much easier for others to work on their rides.
Cheers,
It looks like your build has the brackets(part numbers and stamping, ect) facing inward (opposite of the direction indicated in the install instructions) and the bracket is mounted behind the axle flange plate.
In the instructions the bracket mounts to the outside of the axle flange plate with stamping facing outward (exact opposite).
Now I realize the instructions are for the Mustang and we are adapting the kit for the Ranger, but I am not sure how different the two axle flanges are to make it necessary to cut the bracket.
Couldn't we just mount the bracket unaltered in the same manner as the Mustang? the bolt pattern appears to be the same. I am guessing there is probably a good reason, but perhaps you could enlighten me.
Thanks for being a pioneer to adapt the parts in the first place. Putting this tutorial together makes it much easier for others to work on their rides.
Cheers,
#17
02-05-2012

Join Date: Dec 2009
Location: port crane, new york
Posts: 218
Likes: 0
Received 0 Likes
on
0 Posts
#18
02-05-2012
Join Date: Jun 2007
Location: Phoenix, AZ
Posts: 1,462
Likes: 0
Received 0 Likes
on
0 Posts
#19
02-06-2012
The center diff?? When you open it up it's actually pretty obvious. Basically here's my advice, but it could be diff depending on your ranger rear axle options.
When I opened my diff i noticed that i could slide my axle shafts about a quarter inch in or out. It became obvious that there was a lil ring that was holding them in. So i removed the ring from both sides (can't remember how off the top of my head but it'll be very obvious/easy. Then the two axle shafts slide out. I was lucky enough to pull my diff out and my spider gears fell out and i basically had to learn how a diff works to properly put them back in. But it wasn't too difficult and also yours may be much different. But in all actuality you just need to pull out the axle shafts to put the backing plate on. try to leave the damn diff inside if you can! It'll be easier.
It was all fairly simple. I just have bad luck sometimes.
-Aaron
#20
02-06-2012
Join Date: Jun 2007
Location: Phoenix, AZ
Posts: 1,462
Likes: 0
Received 0 Likes
on
0 Posts
#21
02-07-2012
Join Date: Jan 2012
Location: houston, tx
Posts: 5
Likes: 0
Received 0 Likes
on
0 Posts
You could bolt them up to the out side of the axle flange but your calipers would not be on the discs at all, lol. the brackets have to go on the back of the axle flange to give the proper offset for the rotors.
If you really don't want to cut brackets you can get offset brackets from a few companies that mount on the outside of the axle flange.
If you really don't want to cut brackets you can get offset brackets from a few companies that mount on the outside of the axle flange.
#22
02-07-2012
Join Date: Jan 2012
Location: houston, tx
Posts: 5
Likes: 0
Received 0 Likes
on
0 Posts
Its really quite easy, just remember to ALWAYS use a box-end 6-point wrench. Don't break or strip the bolt holding the pin into the Differential.
#23
02-11-2012
Join Date: Jun 2007
Location: Phoenix, AZ
Posts: 1,462
Likes: 0
Received 0 Likes
on
0 Posts
Yup i accomplished this mod tonight and had zero issuses, A lot easier than I thought itd be. It looks 10x better with the disc in the rear. I used the GT calipers/rotors instead of Grants cobras. It fit like a glove and everything went smoothly!!! Couldnt be happier, thanks again for this DIY mod Grant.
#24
02-16-2012

Join Date: Feb 2012
Location: Newnan, ga
Posts: 3
Likes: 0
Received 0 Likes
on
0 Posts
Hello everyone...new here, and found this thread a few months ago (actually had to join today because i viewed the forum to many times etc) anyway, finally got everything installed and i cant seem to get the ebrake hooked up...i know the easy part! Anyway do need to clip the spring to be able to get it in the mounting bracket?
Everything else was straight forward although the truck sat on jack standa for a week while i waited for the currie brake lines....shoulda ordered them first, sigh. I also ended up running all new hard lines from the split above the axle...napa sells 20" straight hard line with the double flare and fittings for like 6$ each.
I sourced rebuilt calipers from a local parts supplier that didnt mind me turning in a set of old calipers that were not mustang calipers ( sent back a set of front bmw z3 calipers from my old car) worked out to about 40$ per caliper for me....so i spent a total of 320$ on this swap :-) i am very happy!
#25
02-16-2012


